
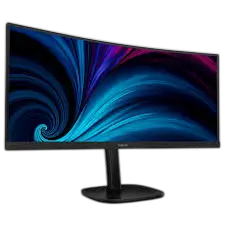
The Philips 34B2U3600C is a 34-inch curved business monitor from the 3000 Series. Its VA panel has a native resolution of 3440 x 1440 and supports Adaptive Sync. The USB-C port carries video, data and typical 90 W power delivery, and the monitor adds a USB hub, an RJ45 Ethernet port, 5 W x 2 speakers, a KVM switch for sharing one keyboard and mouse between two computers, and MultiView for showing two sources at once. The stand adjusts for height, tilt and swivel.
Product Specifications
| Feature | Detail |
| Panel | 34″ (86.36 cm) VA, W-LED backlight |
| Native resolution | 3440 x 1440 @ 60 Hz |
| Maximum resolution | 3440 x 1440 @ 100 Hz (HDMI); @ 120 Hz (DP/USB-C) |
| Contrast ratio | 3500:1 (typical) |
| Video inputs | HDMI 2.0, DisplayPort 1.4, USB-C (DP Alt mode) |
| USB | USB-C upstream (PD 3.0, typical 90 W), USB-B upstream, 4 x USB-A downstream (one fast-charge port, up to 7.5 W) |
| Ethernet | RJ45: 10/100M on USB 2.0, 1000M on USB 3.0 |
| Stand | Tilt -5° to +30°, swivel ±180°, height adjustment 180 mm |
| VESA mount | 100 x 100 mm, M4 screws |
| Power | Built-in, 100–240 V AC, 50/60 Hz; 34.4 W typical at 115 V; 0.3 W in sleep and off modes |
| Size with stand (W x H x D) | 807 x 602 x 287 mm |
| Weight | 10.41 kg with stand, 7.82 kg without |
| Operating conditions | 0°C to 40°C, 20% to 80% humidity |
Your graphics card must support DisplayPort 1.4 or HDMI 2.0, and it also limits the refresh rate you can reach (PDF p. 26).
What’s in the Box
The box holds the monitor, a Quick Start guide, a power cable and a set of video and USB cables. The cable set varies by region and can include HDMI, DisplayPort, USB A-B, USB C-C and USB C-A cables (PDF p. 7).
Installation and Setup
Attach the Base
The panel is curved, so support it during assembly (PDF p. 7).
- Lay the monitor face down on a cushion or other protective material.
- Hold the stand with both hands and attach the base to it.
- Tighten the screw at the bottom of the base by hand.
- Attach the stand to the VESA mount area until the latch locks.
Do not press down on the monitor while attaching or detaching the base.
Connect to Your Computer
- Plug the power cord firmly into the back of the monitor.
- Turn off your computer and unplug its power cable.
- Connect the signal cable (HDMI, DisplayPort or USB-C) to your computer.
- Plug the monitor and computer into nearby outlets.
- Turn on the computer and monitor. If an image appears, setup is complete.
For the RJ45 port, download the matching LAN driver from the Philips support page, run it and restart your computer. If Ethernet feels slow, set the USB-C setting to High Data Speed in the OSD, which supports 1G LAN.
The USB ports are disabled in standby and off modes. To keep USB devices and charging active in standby, set USB Standby Mode to On in the OSD. The default is Off, and a factory reset returns it to Off (PDF p. 9). The display must be powered on for the USB charging ports to work.
2.4 GHz wireless receivers can weaken nearby USB 3.2 devices. Keep receivers away from USB 3.2 ports or use an extension cable or hub.
Controls and On-Screen Display
The front bezel has buttons for power, OSD access and confirm (OK), up/down navigation, brightness, input selection, back, and the SmartImage hotkey. The OSD menus are Input, Picture, PIP/PBP, Audio, Color, Language, OSD Setting, USB Setting and Setup (PDF p. 11).
For best results, set your computer to 3440 x 1440. At any other resolution the monitor shows a “Use 3440 x 1440 for best results” alert, which you can turn off in Setup. By default, HDMI is set to 3440 x 1440 @ 60 Hz (PDF p. 25).
Color temperature options are Native, 5000K, 6500K, 7500K, 8200K, 9300K and 11500K, plus sRGB and a User Define mode with red, green and blue controls.
SmartImage Modes
Press the SmartImage hotkey repeatedly to cycle through EasyRead, Office, Photo, Movie, Game, Economy and Off. EasyRead raises text contrast for documents, Office lowers brightness to reduce eye strain, and Game turns on the overdrive circuit for faster response. The on-screen display closes after 5 seconds, or press OK to confirm.
Using Two Computers: KVM and MultiView
MultiClient Integrated KVM
KVM lets one keyboard and mouse control two PCs (PDF pp. 12–13).
- Connect each PC’s upstream USB cable to the monitor. HDMI or DisplayPort sources pair with the USB UP port, and a USB-C source pairs with the USB C port.
- Open the OSD and go to USB Setting > KVM.
- Select Auto, USB C or USB Up to switch computers.
With KVM set to Auto, pressing Ctrl three times switches sources. Input selection is not automatic, so choose the source you are using in the OSD.
MultiView (PIP and PBP)
MultiView shows a small window inside the main picture (PIP) or two pictures side by side (PBP). In the PIP/PBP menu, choose the mode, the sub input (HDMI 2.0, DisplayPort or USB-C), and the PIP size and position. Swap exchanges the two pictures, and the audio changes with them. In PBP, black strips appear above and below the picture, and analog signals are not supported in full-screen PBP.
Safety Instructions
- Keep the monitor out of direct sunlight and away from oil, heat, dust, rain and moisture.
- Do not tilt the monitor downward more than -5°. Panel peeling can result, and the damage is not covered by warranty (PDF pp. 3, 12).
- Do not press on the screen when adjusting the angle. Grasp only the bezel.
- Use only the Philips power cord and the specified voltage. Do not pull, bend or place objects on the cables.
- Keep ventilation holes clear. After unplugging the power cable, wait 6 seconds before reconnecting it.
- Lift the monitor by its frame, never by the LCD panel.
- Connect the USB-C port only to equipment with a fire enclosure that complies with IEC 62368-1 or IEC 60950-1.
- Run a moving screen saver or periodic screen refresh when the monitor is unattended or showing static content. Severe burn-in cannot be repaired and is not covered by warranty (PDF pp. 4–5).
- If water or a foreign object gets inside, switch off and unplug the monitor immediately and contact service.
Cleaning and Maintenance
Unplug the monitor before cleaning. Wipe the screen with a dry cloth when the power is off, or with a slightly damp cloth. Do not use organic solvents such as alcohol or ammonia-based liquids. Oil-based cleaners can damage the plastic parts and void the warranty.
To prepare for VESA mounting, place the monitor face down on a protected surface, hold the release button while tilting the base out, remove the VESA cover, then loosen the assembly screws and detach the hinge. The monitor accepts a 100 x 100 mm VESA interface with M4 screws. Contact the manufacturer for wall-mount installation (PDF pp. 16–17).
Troubleshooting
- No picture, power LED off: Check the power cord at the outlet and monitor, and make sure the front power switch is on.
- No picture, power LED white: Make sure the computer is on and the signal cable is firmly connected with no bent pins. A blinking white LED means sleep or standby.
- Blurred, dark or fuzzy image: Adjust brightness and contrast in the OSD, and set the PC to 3440 x 1440.
- Ghost image after power off: Use a moving screen saver or screen refresh. It usually fades gradually.
- Flickering PIP/PBP sub-window: The sub source is probably using interlaced timing. Change it to progressive timing.
- Power LED too bright: Adjust it with Power LED in the Setup menu.
- Smoke or sparks: Do not troubleshoot. Disconnect the monitor from mains power immediately and contact Philips customer service.
Small colored or dark dots are normal in LCD panels. A warranty claim requires defects to exceed the pixel defect limits (PDF pp. 28–30).
Frequently Asked Questions
What resolution should I use?
Use the native 3440 x 1440 at 60 Hz. If the screen shows “Cannot display this video mode,” reconnect your previous monitor, set the computer to 3440 x 1440 at a 60 Hz refresh rate, then reconnect this one.
Can I connect a laptop with one USB-C cable?
The USB-C port accepts video through DP Alt mode, carries USB data and provides USB PD 3.0 power at a typical 90 W. If your PC does not support HBR 3, set the USB-C setting to High Resolution under USB Setting.
Why won’t my phone charge when the monitor sleeps?
USB power is off in sleep and standby by default. Set USB Standby Mode to On in the OSD to keep charging active.
How do I switch between two computers?
Connect both PCs as described in the KVM section, then choose Auto, USB C or USB Up in the KVM menu. In Auto, press Ctrl three times to switch.
How do I lock or unlock the OSD controls?
With the monitor off, hold the OSD/OK button and press the power button to turn it on. Repeat the same steps to unlock. To restore factory settings instead, choose Setup > Reset in the OSD.
How many pixel defects are acceptable?
Up to 5 bright or black dot defects in total, with no more than 2 bright and 3 black. Defects of the same type must be more than 15 mm apart.