
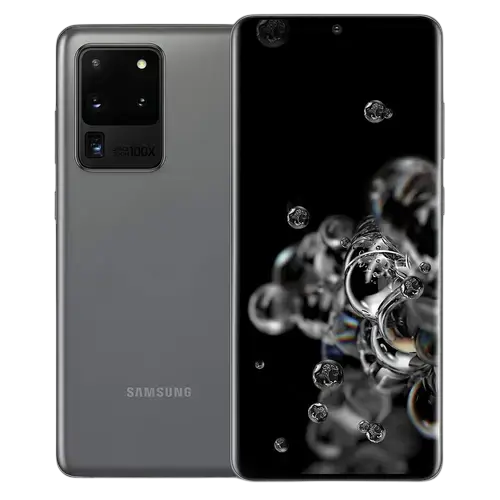
Product Overview
The Galaxy S20 Ultra is a Samsung smartphone with a touchscreen, Edge screen, front and rear cameras, a Side key, a USB Type-C multipurpose jack, a built-in wireless charging coil and a fingerprint recognition sensor (p. 6). The manual is a single document for several Galaxy S20 devices. Its device diagrams are labeled Galaxy S20 Ultra 5G, S20 Ultra (p. 6), Galaxy S20+ 5G, S20+ (p. 7) and Galaxy S20 5G, S20 (p. 8).
The Apps and features and Settings chapters are described as common manuals for Samsung devices. The manual says that content can differ by model, region, service provider or software, and that some described features may not exist on your device (pp. 21, 110, 152). Where this page says a feature depends on the model, region or provider, that wording comes from the manual. Menu and button names are written exactly as printed in the manual.
| Item | What the manual states | Page |
|---|---|---|
| Manual edition | English, 01/2023, Rev. 2.0 | 1 |
| Model codes on the cover | SM-G980F, SM-G980F/DS, SM-G981B, SM-G981B/DS, SM-G985F, SM-G985F/DS, SM-G986B, SM-G986B/DS, SM-G988B, SM-G988B/DS | 1 |
| Charging and audio port | Earphone jack / Multipurpose jack (USB Type-C) | 6 |
| Wireless charging | Built-in wireless charging coil; charger sold separately | 12 |
| SIM options | Nano-SIM card and eSIM; single SIM card tray or dual SIM card tray | 15 |
| Memory card | microSD card; FAT and exFAT file systems supported | 17, 18 |
| Water and dust | IP68 under IEC 60529 (fresh water, 1.5 m, 30 minutes) | 155 |
| Screen refresh rate | Adaptive (up to 120 Hz) or Standard | 124 |
| Maximum video resolution | 8K in the Camera app; 8K and 4K (UHD) 60 fps are saved only in internal memory | 76 |
| Biometric unlock | Face recognition and fingerprint recognition | 129, 131 |
| Battery removal | By an authorized service center only | 180 |
Device Layout and Controls
Parts of the device
The diagram for the Galaxy S20 Ultra 5G, S20 Ultra (p. 6) labels these parts.
| Part | Location notes from the diagram |
|---|---|
| SIM card / microSD card tray | Top edge |
| Speaker | Top of the device and bottom of the device |
| Proximity/Light sensor, Front camera | Front, top |
| Touchscreen and Edge screen | Front; the Edge screen curves along both sides |
| Volume key and Side key | Right side |
| Fingerprint recognition sensor | Front, lower center of the screen (see p. 131) |
| Earphone jack / Multipurpose jack (USB Type-C) | Bottom edge |
| Microphone | Next to the rear camera and at the bottom edge |
| Rear camera, Flash | Back, upper left |
| GPS antenna | Back, top |
| NFC antenna / MST antenna / Wireless charging coil | Back, center |
| Main antenna | Back, bottom |
The S20+ and S20 diagrams (pp. 7–8) label three microphones; the S20 Ultra diagram (p. 6) labels two.
Source: manufacturer manual, pp. 6–8.
Handling cautions for the body of the device
Warning: If you use the device with its glass or acrylic body broken, there may be a risk of injury. Use it only after it has been repaired at a Samsung Service Centre.
Caution: Do not expose the camera lens to a strong light source such as direct sunlight. The manual says a damaged image sensor is irreparable and causes dots or spots in pictures.
- When using the speakers or speakerphone, do not hold the device close to your ears.
- Do not use a sharp object to remove dust from the microphone, speaker or receiver. This can damage the device. Dust in these openings can make the sound quiet or stop some features from working.
- Metallic stickers on the antenna area, a metallic cover, or covering the antenna area with your hands during calls or mobile data use can cause connectivity problems and battery drain.
- Use a Samsung-approved screen protector. Unapproved protectors may cause the sensors to malfunction.
- Do not cover the proximity/light sensor with a screen protector, sticker or cover.
- Covering the area around the upper microphone can cause unwanted noise during calls or media playback.
- A light may flicker at the top of the device during calls because of the proximity sensor. Colors on the Edge screen may look different depending on your viewing position.
Source: manufacturer manual, p. 9.
Hard keys
| Key | Function |
|---|---|
| Side key | When the device is off, press and hold to turn it on. Press to turn on or lock the screen. Press and hold to start a conversation with Bixby. Press twice or press and hold to launch the app or feature you set. |
| Side key + Volume Down key | Press simultaneously to capture a screenshot. Press and hold simultaneously to turn off the device. |
Source: manufacturer manual, p. 10.
Setting the Side key. Launch the Settings app, tap Advanced features → Side key, then choose an option. Under Press and hold you can select the Power off menu instead of Bixby (p. 20).
Soft buttons
When the screen is on, the Recents, Home and Back buttons appear at the bottom. Their functions can change with the app or environment (pp. 10, 24).
| Button | Function |
|---|---|
| Recents | Tap to open the list of recent apps. |
| Home | Tap to return to the Home screen. Tap and hold to launch the Google Assistant app. |
| Back | Tap to return to the previous screen. |
To hide the navigation bar, launch Settings, tap Display → Navigation bar, then tap Swipe gestures under Navigation type. Tap More options to choose Swipe from bottom or Swipe from sides and bottom. The Gesture hint switch hides the hints at the bottom of the screen (p. 24).
Charging the Battery
Charge the battery before first use, or after the device has been unused for a long time (p. 11).
Warning: Use only a Samsung-approved battery, charger and cable made for the device. The manual says incompatible products can cause serious injuries or damage to the device.
Caution: Connecting the charger improperly may cause serious damage, and misuse damage is not covered by the warranty. Use only the USB Type-C cable supplied with the device; a Micro USB cable may damage it.
Source: manufacturer manual, p. 11.
Wired charging
- Connect the USB cable to the USB power adaptor.
- Plug the cable into the device’s multipurpose jack.
- After the battery is fully charged, disconnect the charger from the device.
The charger has no power switch. Unplug it from the electric socket when not in use, and keep it near the socket and easy to reach while charging (p. 11).
Wireless charging
Place the center of the back of the device on the center of a wireless charger (sold separately). When fully charged, remove the device from the charger. The estimated charging time appears on the notification panel (p. 12).
Caution: Do not charge wirelessly with a credit card or RFID card (such as a transportation or key card) between the back of the device and its cover, or with metal objects or magnets between the device and the charger. The device may not charge properly or may overheat, and the device and cards may be damaged. Use Samsung-approved wireless chargers.
Source: manufacturer manual, p. 12.
Quick charging
Launch Settings, tap Battery and device care → Battery → More battery settings, then turn on the feature you want (p. 12).
| Feature | Requirement stated in the manual |
|---|---|
| Fast charging | A battery charger that supports Adaptive fast charging |
| Super fast charging | A USB PD (Power Delivery) charger that supports Super fast charging |
| Fast wireless charging | A charger and components that support the fast wireless charging feature |
Charging is faster while the device or its screen is off. A fan in the charger may be noisy during fast wireless charging; you can add a routine that turns fast wireless charging off at a preset time, which reduces fan noise and the indicator light (p. 12).
Wireless power sharing
The device can charge another device from its own battery, even while the device is itself charging. Accessories or covers can stop this from working, so the manual recommends removing them first (p. 13).
- Open the notification panel, swipe downwards, and tap Wireless power sharing. If it is not on the quick panel, tap the add button and drag it over.
- Place the other device on the center of your device, back to back.
- When finished, remove the other device.
- Do not use earphones while sharing power; it may affect nearby devices.
- Only devices that support wireless charging can be charged this way, and some may not charge. The manual points to the Samsung website for the list of supported devices.
- Do not move or use either device while charging. The power received can be less than the power shared.
- Charging another device while your own device charges may slow charging or stop it, depending on the charger type.
Source: manufacturer manual, p. 13.
To make sharing stop at a set level, launch Settings, tap Battery and device care → Battery → Wireless power sharing → Battery limit, and set the limit (p. 14).
Reducing battery use
The manual lists these options: optimize the device with device care, press the Side key to turn the screen off, activate power saving mode, close unnecessary apps, turn off Bluetooth when not in use, turn off auto-syncing for apps that sync, shorten the backlight time, and lower the screen brightness (p. 14).
Charging tips and precautions
- If the battery is completely discharged, the device cannot be turned on as soon as the charger is connected. Let it charge for a few minutes first (p. 14).
- Charging from a power source other than the charger, such as a computer, may be slower because of a lower electric current (p. 14).
- The device can be used while charging, but full charge may take longer. If the power supply is unstable, the touchscreen may not work; unplug the charger if this happens (p. 14).
- The device and charger may heat up while charging. The manual calls this normal. If the battery gets hotter than usual, the charger may stop charging (p. 15).
- Dry the multipurpose jack thoroughly before charging. Charging with a wet jack may damage the device (p. 15).
- If the device does not charge properly, take the device and the charger to a Samsung Service Centre (p. 15).
Source: manufacturer manual, pp. 14–15.
Nano-SIM Card, eSIM and microSD Card
Nano-SIM card and eSIM
Insert the SIM or USIM card from your mobile service provider. For two numbers or providers on one device, activate the eSIM or insert two SIM cards. Using both a nano-SIM card and the eSIM may slow data transfer in some areas. The eSIM may not be available depending on the region, provider or model (p. 15).
Installing the SIM or USIM card
- Insert the ejection pin into the hole on the tray to loosen it.
- Pull the tray out gently.
- Place the SIM or USIM card on the tray with the gold-colored contacts facing down and press it gently into the tray.
- Insert the tray back into the slot.
Caution: Use only a nano-SIM card. Keep the ejection pin perpendicular to the hole or the device may be damaged. Make sure the tray is dry before inserting it, and push it fully in to keep liquid out. If the card is not seated firmly, it may fall out of the tray.
Source: manufacturer manual, pp. 15–16.
The dual SIM card tray diagram shows two nano-SIM cards (Nano-SIM card 1 and Nano-SIM card 2) on one side, or a nano-SIM card and a microSD card on the other (p. 16).
Activating an eSIM
Launch Settings and tap Connections → SIM manager → Add eSIM. When a mobile plan is found, follow the on-screen instructions. With a QR code from your provider, tap Add eSIM → Scan QR code from service provider and scan the code (p. 16).
SIM manager (dual SIM models)
Launch Settings and tap Connections → SIM manager (p. 17).
| Option | What it does |
|---|---|
| SIM cards | Activate the SIM card to use and customize its settings |
| eSIMs | Activate the eSIM |
| Preferred SIMs | Pick which SIM is used for features such as voice calls when two cards are active |
| Data switching | Use another SIM for data if the preferred SIM cannot connect |
| More SIM settings | Customize call or eSIM settings |
Inserting a microSD card
SD card capacity and compatibility vary by card maker and type. The manual points to the Samsung website for the maximum capacity (p. 17).
- Insert the ejection pin into the hole on the tray to loosen it.
- Pull the tray out gently.
- Place the SD card on the tray with the gold-colored contacts facing down and press it gently into place.
- Insert the tray back into the slot.
- Use only a microSD card, inserted right-side up. An incompatible card may damage the device, the card or the data on it.
- Removing the tray disables the mobile data connection.
- The device supports the FAT and exFAT file systems. A card in another format must be formatted, or the device may not recognize it. If the device cannot format or recognize the card, contact the card maker or a Samsung Service Centre.
- Frequent writing and erasing shortens an SD card’s life.
- The card’s files appear in My Files → SD card.
Source: manufacturer manual, pp. 17–18.
Removing the SD card
- Open Settings and tap Battery and device care → Storage.
- Swipe left to view the SD card page.
- Tap the menu icon → Unmount, then remove the card.
Caution: Do not remove external storage while the device is transferring or accessing data, or right after a transfer. Data can be damaged or lost, and the storage or phone can be damaged.
Source: manufacturer manual, p. 18.
Formatting the SD card
An SD card formatted on a computer may not work with the device, so format it on the device: open Settings, tap Battery and device care → Storage, swipe left to the SD card page, and tap the menu icon → Format.
Caution: Back up important data before formatting. The warranty does not cover data loss caused by user actions.
Source: manufacturer manual, p. 19.
Turning the Device On, Off and Restarting
Follow posted warnings and instructions from authorized personnel where wireless devices are restricted, such as aircraft and hospitals (p. 19).
- Turn on: press and hold the Side key for a few seconds (p. 19).
- Turn off: press and hold the Side key and Volume Down key together, or open the notification panel, swipe down and tap the power icon. Then tap Power off. Tap Restart to restart (p. 20).
Caution: Forced restart: if the device is frozen and unresponsive, press and hold the Side key and the Volume Down key at the same time for more than 7 seconds.
Source: manufacturer manual, pp. 20, 176.
When you turn on the device for the first time, or after a data reset, follow the on-screen setup. Without a Wi-Fi connection, some features may not be set up during initial setup (p. 20).
Using the Screen, Home Screen and Notification Panel
Samsung account
- Launch Settings and tap Samsung account. Alternatively, tap Accounts and backup → Manage accounts → Add account → Samsung account.
- Sign in, or tap Create account if you do not have one.
If you forget the ID or password, tap Find ID or Forgot password? on the sign-in screen. Signing out removes data such as contacts and events from the device. To sign out, tap Accounts and backup → Manage accounts → Samsung account → My profile → Sign out, then confirm with your password (p. 22).
Touchscreen gestures
The manual describes tapping, tapping and holding (about 2 seconds), dragging, double-tapping, swiping, and spreading and pinching (p. 23).
Caution: Keep the touchscreen away from other electrical devices, because electrostatic discharge can cause it to malfunction. Do not tap it with sharp objects or press excessively. Avoid showing fixed graphics on all or part of the screen for long periods, which can cause afterimages (screen burn-in) or ghosting. The device may not detect touches near the screen edges.
Source: manufacturer manual, p. 23.
Home screen and Apps screen
- Swipe up on the Home screen to open the Apps screen. Swipe up or down on the Apps screen, or tap Home or Back, to return (p. 25).
- To add an Apps button: tap and hold an empty area of the Home screen, tap Settings, then turn on Show Apps screen button on Home screen (p. 25).
- To edit the Home screen, tap and hold an empty area or pinch. You can add, move or delete panels, and change wallpaper, themes, widgets and settings (p. 26).
- To show all apps on the Home screen, tap and hold an empty area, then tap Settings → Home screen layout → Home screen only → Apply (p. 26).
- To add an app shortcut, tap and hold the app on the Apps screen and tap Add to Home. Drag an app over another to create a folder (p. 27). To delete a folder, tap and hold it and tap Delete folder; the apps move to the Apps screen (p. 28).
- Finder: on the Apps screen tap Search, or open the notification panel and use the search icon, then type a keyword (p. 27).
Edge panel
Drag the Edge panel handle toward the center of the screen to reach favorite apps and features. If the handle is not visible, launch Settings, tap Display, and turn on the Edge panels switch (p. 28).
Lock screen
Pressing the Side key turns off and locks the screen. To unlock, swipe in any direction. To wake the screen, press the Side key or double-tap the screen. Change the method under Settings → Lock screen → Screen lock type (p. 29).
Caution: Auto factory reset: you can set the device to perform a factory data reset after too many incorrect unlock attempts. Launch Settings, tap Lock screen → Secure lock settings, unlock with your current method, and turn on Auto factory reset. Back up your data first.
Source: manufacturer manual, p. 29.
Status bar indicator icons
The manual lists these common icon meanings (pp. 29–30): no signal; signal strength; roaming; GPRS, EDGE, UMTS, HSDPA, HSPA+, LTE and 5G network connected; LTE in a network that includes 5G; Wi-Fi connected; Bluetooth activated; S Pen connected/disconnected and S Pen battery level; location services in use; call in progress; missed call; new text or multimedia message; alarm activated; mute or vibration mode; flight mode; error or caution required; battery charging or battery level. The status bar may not appear in some apps (drag down from the top to show it), some icons appear only in the notification panel, and icons can differ by provider or model.
Notification panel and quick setting buttons
Drag the status bar down to open the panel and swipe up to close it. Tap quick setting buttons to turn features on; swipe down for more buttons. Tap the text under a button to change feature settings, or tap and hold for detailed settings. To rearrange, tap the menu icon → Edit buttons, then drag (pp. 31–32).
- Media output: control music or video playback.
- Device control: control nearby connected devices and SmartThings devices and scenes (p. 32).
Entering text
A keyboard appears automatically. The manual covers uppercase and caps lock, symbols, space, delete and line break keys. To change input languages, tap the settings icon → Languages and types → Manage input languages. If the keyboard button is missing from the navigation bar, go to Settings → General management → Keyboard list and default and turn on Keyboard button on navigation bar. Some languages do not support text entry (p. 33).
To copy and paste, tap and hold over text, drag the handles or tap Select all, tap Copy or Cut, tap and hold where the text should go, and tap Paste. To paste earlier items, tap Clipboard (p. 34).
Installing and Managing Apps
- Galaxy Store: purchase and download apps made for Samsung Galaxy devices; it may not be available depending on provider or model (p. 35).
- Play Store: purchase and download apps. Auto-update options are under your account icon → Settings → Network preferences → Auto-update apps (p. 35).
- Uninstall or disable: tap and hold an app and choose Uninstall or Disable. Disable applies to default apps that cannot be uninstalled. To re-enable, go to Settings → Apps → menu icon → Disabled → OK, select the app and tap Enable (p. 35).
- Permissions: Settings → Apps, choose an app and tap Permissions, or use the Permission manager to review by category. Without permissions, an app’s basic features may not work (p. 36).
Built-In Apps
Phone
- Make a call: launch Phone, tap Keypad, enter the number and tap the call button. Video call buttons are also shown (p. 37).
- Call from Recents or Contacts: swipe right on a contact or number. If this does not work, turn on Swipe to call or text under the menu → Settings → Other call settings (p. 37).
- Speed dial: Keypad → menu → Speed dial numbers. Tap and hold the number to call. For numbers 10 and up, tap the first digits and hold the last (p. 37).
- International call: tap and hold 0 until + appears, then enter country code, area code and number (p. 38).
- Answer or reject: drag the answer or reject icon outside the large circle. To reject with a message, drag the Send message bar up. Edit messages under Quick decline messages (p. 38).
- Block numbers: menu → Settings → Block numbers. Blocked callers do not trigger notifications, but calls are logged. Block calls from unknown numbers blocks calls with no caller ID (p. 38).
Contacts
Create a contact with the add button, a storage location and Save. Import with menu → Manage contacts → Import contacts. Sync with web accounts under Settings → Accounts and backup → Manage accounts → Sync account → Contacts. Delete, share and group contacts from the menu → Edit, and merge duplicates with Manage contacts → Merge contacts (pp. 39–40).
Messages
Launch Messages, tap the compose button, add recipients and a message, and tap send. Tap and hold the voice icon to record a voice message. You can sort by category (turn on Conversation categories if it is missing), delete a message by tap and hold, and change settings including blocking and notifications. Roaming may add charges (pp. 41–42).
Internet
Launch the Internet app, enter a web address or keyword and tap Go. To use secret mode, tap the tabs icon → Turn on Secret mode, turn on Lock Secret mode, tap Start and set a password. Some features, such as screen capture, are unavailable in secret mode (p. 43).
Multi window
- Split screen view: tap Recents, swipe to the app, tap its icon and tap Open in split screen view, then pick a second app (p. 44).
- From the Edge panel: drag the handle in, tap and hold an app, drag it left and drop it at Drop here to open (p. 45). You can save an app pair from the circles between windows (p. 45).
- Resize: drag the circles between windows; dragging to the edge maximizes a window (p. 45).
- Pop-up view: from Recents choose Open in pop-up view, or drop an app at Drop here for pop-up view. Tapping Home minimizes the window to an icon. Drag the window’s toolbar to move it (p. 46).
- Some apps do not support Multi window (p. 44).
Bixby and Bixby Vision
Press and hold the Side key to launch Bixby. Complete setup by choosing a language and signing in to your Samsung account. Speak while holding the key, or say “Hi, Bixby” after turning on Voice wake-up (Bixby app → menu → Settings → Voice wake-up, then Wake with “Hi, Bixby” and Recognise voice). You can also type to Bixby. Bixby is available only in some languages and regions (pp. 47–48).
Bixby Vision searches by recognizing images. Open it from the Camera app (MORE → BIXBY VISION), Gallery, the Internet app, or its own icon. Features are TRANSLATE, TEXT and DISCOVER. Results can be wrong depending on image size, format or resolution, and Samsung is not responsible for the product information shown (p. 49).
Samsung Kids
Open the notification panel, swipe down and tap Kids. Parental controls and closing Samsung Kids require your screen lock method or the PIN you created. Reach parental controls from the menu → Parental controls, and close Samsung Kids with Back or the menu → Close Samsung Kids (p. 50).
Other Samsung apps
| App | What the manual says | Page |
|---|---|---|
| Samsung Health | Set fitness goals, track progress and wellness, compare step counts and view tips. Some features depend on region. Vibration in a car or train may affect step count. | 51 |
| Samsung Notes | Create notes by typing, handwriting or drawing; insert images or voice recordings; save as another file format with menu → Save as file. | 52 |
| Samsung Members | Device problem diagnosis, questions and error reports, community and tips. | 53 |
| Samsung Global Goals | Information on the United Nations Global Goals. | 53 |
| Galaxy Shop | Opens the Samsung website; may be named Samsung Shop and may be unavailable by provider or model. | 53 |
| Galaxy Wearable | Manage wearable devices; tap Start to connect, then follow the prompts. | 54 |
| Calendar | Create events; sync with accounts under Settings → Accounts and backup → Manage accounts → Sync account → Calendar. | 54 |
| Reminder | To-do reminders with conditions. Location reminders need GPS and may be unavailable by model. Start it from Calendar menu → Reminder. | 55 |
| My Files | Manage stored files; Analyse storage helps free space. | 56 |
| Clock and Calculator | Alarms, world clock, timers; simple and scientific calculations, history and unit conversion. | 56 |
Game Launcher and Game Booster
Game Launcher gathers games from Play Store and Galaxy Store. If it is missing, turn it on under Settings → Advanced features → Game Launcher. Choose a performance mode under More → Game Booster → Game optimisation: Performance (best performance), Standard (balances performance and battery) or Battery saver (p. 57).
Game Booster, opened from the navigation bar during a game, can lock the touchscreen, hide navigation buttons, capture screenshots, record gameplay, set Priority mode (blocks calls and all notifications except alarms), and show Temperature / Memory, with options to adjust volume or frame rate to prevent overheating. Options vary by game (p. 58).
SmartThings, Smart View, Music Share and Link to Windows
- SmartThings: Devices → Add device, then follow the prompts. Errors or defects in connected devices are not covered by the Samsung warranty; contact the device’s manufacturer (p. 59).
- Smart View: open the notification panel, tap Smart View and select a screen-mirroring-enabled TV or monitor. Video resolution may vary by TV model (p. 59).
- Music Share: supports sharing your connected Bluetooth speaker, and listening together with Galaxy Buds on supported devices. Turn on Music Share under Settings → Connections → Bluetooth → menu → Advanced settings (pp. 60–61).
- Link to Windows: Settings → Connected devices → Link to Windows. A Microsoft account is required, and the manual recommends the latest Windows and Phone Link app (p. 62).
Samsung DeX
Samsung DeX lets you use the phone like a computer on an external display or a computer, and you can still use the phone at the same time (p. 63).
Caution: Use only official Samsung DeX-supported accessories. Problems caused by unsupported accessories are not covered by the warranty.
Source: manufacturer manual, p. 63.
| Connection | Steps from the manual | Page |
|---|---|---|
| HDMI to TV or monitor | Connect a USB Type-C to HDMI adaptor to the phone and an HDMI cable between the adaptor and the display, then tap Start on the phone. | 63–64 |
| USB cable to computer | Download the Samsung DeX app on the computer, connect with a USB cable, then tap Start now. To use the supplied cable, the computer needs a USB Type-C port. | 64–65 |
| Wireless | Notification panel → DeX → DeX on TV or monitor or DeX on PC, pick the device and tap Start now, then accept the request. The computer must be on the same Wi-Fi network and running the Samsung DeX app. Some TVs appear only in screen mirroring mode. | 65 |
- The manual recommends a Samsung Smart TV made after 2019 and a TV that supports screen mirroring (p. 65).
- You can control DeX with a wireless keyboard and mouse, or use the phone as a touchpad from the navigation bar (or Use your phone as a touchpad in the notification panel). With a front-cover case, open the cover (p. 66).
- When starting or ending DeX, running apps may be closed; some apps or features are unavailable. Change audio output from the status bar → Media output (p. 67).
- To lock both screens, use the menu → Lock DeX; the Side key does not lock them while DeX is in use (p. 68).
- On a computer you can drag files between the computer and the DeX My Files or Gallery, and copy and paste text (pp. 67–68).
Google apps
The manual lists Chrome, Gmail, Maps, YT Music, Google TV, Drive, YouTube, Photos, Google, Meet and Messages. A Google account may be required, and some apps may be unavailable by provider or model (p. 69).
Camera
Caution: Do not photograph or record people without permission, where it is legally prohibited, or where you may violate privacy (p. 70).
Taking photos
- Launch the Camera app. You can also press the Side key twice quickly or drag the camera icon left on the locked screen.
- Tap the preview where the camera should focus. Drag the adjustment bar to change brightness.
- Tap the camera button to take the photo. Drag the shooting modes list, or swipe on the preview, to change mode.
- Some features are unavailable when launching from the locked screen or with the screen off while a lock method is set. The camera shuts off automatically when unused (p. 70).
- Close subjects at high resolution or zoom may be out of focus. Clean the lens if photos are blurry. A damaged or dirty lens may stop high-resolution modes from working (p. 71).
- The wide-angle lens can cause minor distortion; the manual says this does not indicate a performance problem (p. 71).
- Sudden temperature changes can fog the camera. Let it dry naturally at room temperature before shooting (p. 71).
Zoom and the camera button
Select 0.5x, 1x or 5x, drag the zoom control, or spread and pinch. The manual describes 0.5x as the Ultra wide camera, 1x as the wide-angle camera and 5x as the telephoto camera. Zoom works only with the rear camera (p. 72). Tap and hold the camera button to record video, or swipe it to the edge and hold for burst shots. A Floating Shutter button can be added under the settings icon → Shooting methods (p. 72).
Shooting modes
| Mode | How to start | Notes from the manual | Page |
|---|---|---|---|
| Photo | PHOTO | Auto-adjusts options; high-resolution option available (resolution may vary by model). | 73 |
| Video | VIDEO | Switch cameras by swiping; capture a frame while recording; tap and hold to change focus. Long zoom use may lower quality to prevent overheating. | 75 |
| High-resolution video | Video options | Maximum 8K. 8K and 4K (UHD) 60 fps recordings are saved only in internal memory. Save a frame as a photo from Gallery. | 76 |
| Dual recording | MORE → DUAL RECORDING | Records the subject and the person filming on one screen. | 76 |
| Single take | MORE → SINGLE TAKE | One capture creates several photos and videos. | 77 |
| Portrait / Portrait video | PORTRAIT or MORE → PORTRAIT VIDEO | Blurs the background. Needs enough light; may not work well with movement, thin or transparent subjects, or similar or plain backgrounds. | 78 |
| Pro / Pro video | MORE → PRO or PRO VIDEO | Manual ISO, SPEED, EV, FOCUS, WB, MIC and ZOOM (Pro video). 8K, 4K (UHD) 60 fps and FHD (120 fps) pro videos are saved only in internal memory. | 79 |
| Night | MORE → NIGHT | Low-light shots without flash; hold steady until done; a tripod gives brighter, steadier results. | 80 |
| Food | MORE → FOOD | Drag the circular frame; the outside blurs; adjust color tone. | 80 |
| Panorama | MORE → PANORAMA | Move slowly in one direction within the guide frame; avoid plain backgrounds. | 81 |
| Super Slow-mo | MORE → SUPER SLOW-MO | Needs enough light; can auto-record when motion is detected, but may trigger at the wrong moment under flickering light. | 81–82 |
| Slow motion | MORE → SLOW MOTION | Up to two slow motion sections are created. | 82 |
| Hyperlapse | MORE → HYPERLAPSE | Choose a frame rate or let the device adjust it automatically. | 83 |
Other notes: Shot suggestions shows a guide that turns yellow when the composition is ideal (p. 74). Press and hold to lock focus (AF) and exposure (AE) (p. 75). Selfies can be taken by switching to the front camera (p. 74).
Camera settings
Tap the settings icon on the preview screen. Some options depend on the shooting mode (p. 83).
- Intelligent features: Scene optimiser, Shot suggestions, Scan QR codes (p. 83).
- Pictures: Swipe Shutter button to, Watermark, and Advanced picture options such as High efficiency pictures (HEIF) and RAW copies (DNG, saved with a JPG in pro mode; uses more storage) (p. 83).
- Selfies: Save selfies as previewed, Selfie colour tone (p. 84).
- Videos: Video stabilisation and Advanced video options: Reduce file size (HEVC), HDR10+ videos, Zoom-in mic (p. 84).
- General: Auto HDR, Tracking auto-focus, Grid lines, Location tags, Shooting methods, Settings to keep, Storage location (appears with an SD card) and Vibration feedback (p. 85).
- Privacy: Privacy Notice, Permissions, Reset settings, Contact us, About Camera (p. 86).
Caution: HEVC videos cannot be played on other devices or shared online, and some shooting modes cannot record in HEVC. HDR10+ video plays properly only on devices that support HDR10+ (p. 84). Turn off Location tags to avoid showing your location on photos uploaded online (p. 85).
Gallery, AR Zone and Voice Recorder
Gallery
- View images and videos, group similar images, and crop an enlarged area by spreading two fingers and tapping the crop icon (pp. 87–88).
- During video playback, drag on the left side for brightness and the right side for volume; swipe left or right to seek. More options are under menu → Open in Video player (p. 89).
- Video brightness: Settings → Advanced features → Video brightness → Bright. It is available only in some apps and increases battery use (p. 89).
- Albums, Stories and sync: create albums from the Albums tab; turn on OneDrive sync under menu → Settings → Sync with OneDrive; turn on the Recycle bin switch to keep deleted files for a limited time (p. 90).
AR Zone
Open AR Zone from its app or Camera → MORE → AR ZONE. It includes AR Emoji Studio (create an emoji from a pre-made emoji, a selfie or an image, then create short videos, call screens, lock screens, or a contact profile), AR Emoji Camera (SCENE, MASK, MIRROR, PLAY), AR Emoji Stickers (create, delete and use stickers in Messages) and AR Doodle (draw on faces or spaces and record video). Some features may depend on provider or model (pp. 91–96).
Voice Recorder
Launch Voice Recorder, tap record, speak, tap pause or BOOKMARK as needed, tap stop, then enter a file name and Save. Modes are Standard, Interview (records sound from the top and bottom at higher volume and lets you mute sound sources on playback) and Speech-to-text (set the voice memo system language to match what you speak) (pp. 97–98).
Wallet, Payments and Sharing
- Samsung Wallet: payments, identity verification with Samsung Pass, tickets, and a vehicle digital key. Availability depends on region and model; the vehicle must support digital keys, and the key is saved only on the smartphone (pp. 99–100).
- Digital key with NFC: turn on NFC and contactless payments under Settings → Connections; touch the NFC antenna area to the door, and use the vehicle’s wireless charging pad to start the vehicle (p. 100).
- Samsung Pay: register a fingerprint and PIN during setup, drag a card up to pay, authenticate, and touch the back of the device to the reader. Payments may fail depending on the network connection (pp. 101–102).
Sharing content
- Select content, tap the share icon and choose a method. Sharing over the mobile network may incur charges (p. 103).
- Quick Share works with nearby devices over Wi-Fi Direct or Bluetooth, or with SmartThings-supported devices. Set who can find you: No one, Contacts only or Anyone nearby. Videos cannot be shared to TVs or SmartThings devices this way; use Smart View (p. 103).
- Web link: upload large files and share by Copy link, Share link using app or Share using QR code (p. 104).
Screenshots and screen recording
- Key capture: press the Side key and Volume Down key together. Swipe capture: swipe the edge of your hand across the screen; if it does not work, turn on Palm swipe to capture under Settings → Advanced features → Motions and gestures (p. 105).
- Some apps and features do not allow screenshots. If the toolbar does not show, turn on Show toolbar after capturing under Screenshots and screen recorder (p. 105).
- Screen recorder: open the notification panel, tap Screen recorder, choose a sound setting and tap Start recording. Tap the stop button to finish; the video is saved in Gallery (p. 106).
Smart Switch
Launch Settings and tap Accounts and backup → Bring data from old device. The manual describes transfer by USB cable, wirelessly over Wi-Fi Direct, from external storage such as a microSD card (External storage transfer), and from a computer using the Smart Switch computer app (pp. 107–109).
Caution: Do not disconnect the USB cable while transferring files; this may cause data loss or device damage. Transfers increase battery use, and low battery may interrupt them. Transfer only content you own or have the right to transfer.
Source: manufacturer manual, p. 107.
Settings
Open the Settings app and tap the search icon to find a setting by keyword (p. 110). The paths below are the ones the manual gives.
Connections
- Wi-Fi: Settings → Connections → Wi-Fi, turn on the switch and pick a network. The device reconnects automatically unless you turn off Auto reconnect. If you cannot connect, restart Wi-Fi or the router (p. 112). Request password can fetch a password from a contact’s device; Wi-Fi Direct connects devices without an access point (p. 113).
- Bluetooth: pair under Connections → Bluetooth; the device is visible to others while that screen is open. Operating distance may be reduced by obstacles, and some untested devices may be incompatible (p. 114). To unpair, tap the settings icon next to the device → Unpair (p. 114).
- NFC and contactless payments: turn on the switch, keep the screen on and unlocked, and place the NFC antenna area near a tag. Register with a mobile payment service through your provider before paying (pp. 115–116).
- Flight mode: disables all wireless functions. Follow airline regulations and crew instructions (p. 111).
- Data saver: Connections → Data usage → Data saver; you can allow specific apps (p. 116). Mobile data only apps keep selected apps on mobile data even on Wi-Fi (p. 117).
- Mobile Hotspot: Connections → Mobile Hotspot and Tethering → Mobile Hotspot. If other devices cannot find it, tap Configure, set Band to 2.4 GHz and turn off Hidden network. Additional charges may apply (p. 117).
- More connection settings: Nearby device scanning, Printing (plug-ins), VPN, Private DNS and Ethernet (pp. 118–119).
Connected devices
Settings → Connected devices includes Quick Share, Auto switch Buds, Call & text on other devices, Continue apps on other devices, Link to Windows, Samsung DeX, Smart View, SmartThings and Android Auto (p. 119).
Modes and Routines
Add a mode or routine under Modes and Routines. Modes and auto routines run when their conditions are detected; you can also turn modes on manually or run a routine by its play button or Home screen widget. Stop a running routine from the Running list (pp. 120–121).
Sounds, vibration and notifications
Under Sounds and vibration you can choose sound, vibrate or mute, set ringtones and volume, vibration intensity, Sound quality and effects (Dolby Atmos, Equaliser, UHQ upscaler, Adapt sound) and Separate app sound to play one app’s media through a Bluetooth speaker or headset (pp. 121–122). Under Notifications you can manage app notifications, lock screen notifications, pop-up style and Do not disturb (p. 123).
Display
- Light / Dark, brightness, adaptive brightness, Eye comfort shield, font size and style, screen zoom and screen timeout (pp. 123–124).
- Motion smoothness: Adaptive adjusts the refresh rate automatically up to 120 Hz; Standard conserves battery (p. 124).
- Screen resolution: higher resolution uses more battery, and some running apps may close when you change it (p. 124).
- Screen mode: Vivid (adjustable white balance and R, G, B values) or Natural. Colors can be adjusted only in Vivid mode, which may not suit third-party apps (p. 125).
- Touch sensitivity can be increased for use with screen protectors; Accidental touch protection helps in dark places such as a pocket or bag (p. 124).
Wallpaper, themes, Home screen and Lock screen
Wallpaper and style, Themes, Home screen and Lock screen each have their own Settings entry (p. 126). Lock screen options include Screen lock type, Smart Lock, Secure lock settings, widgets, Always On Display and Roaming clock (pp. 126–127). Smart Lock needs a screen lock method, and after four hours of non-use or on power-on you must unlock with your pattern, PIN or password (p. 127). Always On Display appears only when you tap the screen by default; change this under Lock screen → Always On Display (p. 127). Double-tap a notification icon on it to open that notification (p. 128).
Security and privacy
Settings → Security and privacy includes Find My Mobile, App security, Updates, Privacy, Biometrics, Samsung Pass, Secure Folder, Secure Wi-Fi, Private Share, Samsung Blockchain Keystore, Install unknown apps and other security settings (pp. 128–129).
Face recognition
- Go to Settings → Security and privacy → Biometrics → Face recognition and tap Continue.
- Set a screen lock method.
- Position your face inside the frame so the camera can scan it.
Afterwards, turn on Face unlock after unlocking with your preset method. To remove the data, tap Remove face data → Remove. Register indoors and out of direct sunlight (p. 130).
Caution: Face recognition is less secure than Pattern, PIN or Password, and the device could be unlocked by someone or something that looks like you. After a restart, the face cannot unlock the screen the first time; you must use your pattern, PIN or password, so do not forget it. Changing the lock method to Swipe or None deletes all biometric data.
Source: manufacturer manual, pp. 129–130.
Fingerprint recognition
- Go to Settings → Security and privacy → Biometrics → Fingerprints and tap Continue.
- Set a screen lock method.
- Tap Register, place your finger on the sensor, lift it and place it again, repeating until registered.
- Tap Done. Turn on Fingerprint unlock after unlocking with your preset method.
The sensor is at the bottom center of the screen. Keep the sensor area and fingers clean and dry, and press with the wide surface of the fingertip (pp. 131–132). Hide or show the icon with Show icon when screen is off; delete a print with Remove (p. 133).
Caution: If you replace the screen protector, make sure it allows use of the ultrasonic fingerprint sensor. If your pattern, PIN or password is forgotten, you cannot use the device without resetting it, and Samsung is not responsible for data loss from forgotten unlock codes. Do not scratch the sensor area with coins, keys, pens or necklaces.
Source: manufacturer manual, pp. 131–132.
Samsung Pass
Register biometric data under Security and privacy → Samsung Pass. It can verify your Samsung account password, sign in to supported websites (through the Internet app) and apps, and autofill personal information. The manual says biometric data stays on the device and is not synced. Leaving Samsung Pass deletes its data, including on other devices signed in to your Samsung account (pp. 133–135).
Secure Folder
Secure Folder is a separate secured storage area for private content and apps (p. 135). Set it up under Security and privacy → Secure Folder. When asked, tap Activate to allow resetting the lock type with your Samsung account; otherwise you cannot reset it if forgotten (p. 136).
Caution: Data in Secure Folder cannot be transferred by unapproved methods such as USB or Wi-Fi Direct. Customizing the operating system or modifying software locks Secure Folder automatically, making it inaccessible. Back up a copy of the data elsewhere first.
Source: manufacturer manual, p. 135.
- Move files in with menu → Add files (Move deletes the originals; Copy keeps them), and out with Move out of Secure Folder (pp. 136–137).
- Add or remove apps and accounts from inside Secure Folder (p. 137).
- Hide it with Add Secure Folder to Apps screen, or uninstall it from menu → Settings → More settings → Uninstall. Tick Move media files out of Secure Folder to keep media; Samsung Notes content is not backed up (p. 138).
Secure Wi-Fi, Location and Safety and emergency
- Secure Wi-Fi encrypts data on Wi-Fi networks and can slow the connection. A free monthly protection plan is provided, with paid plans available (pp. 138–139).
- Location: App permissions, Location services and Recent access (p. 139).
- Safety and emergency: Medical info, Emergency contacts, Emergency SOS (emergency call to a preset number when you press the Side key five times), Emergency sharing, Silence notifications while driving, Emergency Location Service and Wireless emergency alerts (p. 140).
Accounts and backup
Under Accounts and backup you can manage accounts, back up and restore with Samsung Cloud (Back up data → select items → Back up now; Restore data → pick a device and items), use Google Drive backup, and open Smart Switch. The manual advises regular backups to Samsung Cloud or a computer in case data is lost, including from an unintended factory data reset (pp. 140–141).
Advanced features, Digital Wellbeing and device care
- Advanced features: Labs, Side key, Motions and gestures, One-handed mode, Smart suggestions, Screenshots and screen recorder, Video call effects, Game Launcher, Video brightness and Dual Messenger (pp. 142–144).
- Motions and gestures: Lift to wake, Double tap to turn on screen, Double tap to turn off screen, Keep screen on while viewing, Alert when phone picked up, Mute with gestures, Palm swipe to capture (p. 143).
- Dual Messenger: installs a second copy of a supported messenger app for a second account. Uninstalling the first app also deletes the second (p. 144).
- Digital Wellbeing and parental controls: Screen time goal, App timers, Driving monitor, Volume monitor and Parental controls (p. 145).
- Battery and device care: Optimise now closes background apps, manages abnormal battery usage and scans for crashed apps and malware (p. 145). Battery offers Power saving, Background usage limits, Wireless power sharing and More battery settings (p. 146). Storage, Memory and Device protection (Scan phone) follow (p. 146). Auto optimisation (Restart when needed), Software update and Diagnostics are described on p. 147.
Software update, General management and About phone
- Software update: Download and install, Auto download over Wi-Fi and Last update. Emergency security updates may install automatically without your agreement (p. 149).
- General management: Language, App languages, Text-to-speech output, Voice input, Date and time (the time and date reset if the battery remains fully discharged), keyboard settings, Reset, Customisation Service and Contact us (pp. 147–148).
- Adding a language: General management → Language → Add language, pick a language, then Set as default or Keep current (p. 148).
- About phone: Status information, Legal information, Software information and Battery information. Tap Edit to rename the device (p. 150).
Water and Dust Resistance
The manual states the device was tested in a controlled environment and received the IP68 rating under the IEC 60529 standard from an accredited testing lab. Test conditions were fresh water, 1.5 m, 30 minutes, 15–35 °C and 86–106 kPa. The page does not separate the S20 Ultra from the other devices in the manual (p. 155).
Caution: Do not immerse the device deeper than 1.5 m or for more than 30 minutes. Do not expose it to unclean water or other liquids, such as salty water, swimming pool water, soapy water, oil, perfume, sunscreen, hand cleaner, chemical products such as cosmetics, or liquids that include alcohol. Do not expose it to water moving with force, use it in places that are too hot or humid, such as a sauna, or drop it or subject it to heavy impact.
Source: manufacturer manual, p. 155.
If the device gets wet or dirty, wipe it with a soft, clean cloth and dry it thoroughly. A microphone or speaker that is not fully dry may sound unclear during calls, and the touchscreen may not work properly if used in water. Do not connect the charger or accessories until the device, including the multipurpose jack, is completely dry (p. 155).
Precautions for Using the Device
- Descriptions are based on default settings. Content can differ by region, provider, model or software (p. 152).
- Samsung is not liable for performance issues from apps supplied by other providers, or from edited registry settings or modified operating system software (p. 152).
- Modifying the operating system or installing software from unofficial sources can cause malfunctions, data corruption or loss, violates the Samsung licence agreement and voids the warranty (p. 152).
- Data services, including messaging, syncing and location services, may cost extra. The manual recommends Wi-Fi for large transfers (p. 152).
- A protective screen protector may be attached at the factory depending on region or provider. Damage to it is not covered by the warranty (p. 152).
- To reduce burn-in, set Screen timeout under Display and turn on Adaptive brightness (p. 153).
- The FCC ID, where applicable, is under Settings → About phone → Status information. Regulatory information, where available, is under About phone → Regulatory information (p. 153).
Warning: The device contains magnets. Keep it away from credit cards, implanted medical devices and other devices that magnets may affect. Keep it more than 15 cm from medical devices. Stop using the device if you suspect interference and consult your physician or the medical device manufacturer.
Source: manufacturer manual, p. 153.
The manual uses three instructional icons: Warning (could cause injury to you or others), Caution (could damage your device or other equipment) and Notice (notes, tips or extra information) (p. 153).
Package contents and accessories
Package contents are listed in the quick start guide. Supplied items and available accessories vary by region or provider. Use only Samsung-approved accessories; unapproved ones may cause problems that the warranty does not cover. The supplied USB Type-C earphones, which support digital output, are designed only for this device (p. 154).
Source: manufacturer manual, p. 154.
Device Overheating
The device and charger may become hot during charging, especially with wireless or fast charging. The manual calls this a normal operating range and says it does not affect lifespan or performance. If the battery becomes too hot, charging may slow or stop (p. 156).
If the device heats up while charging, disconnect the charger and close running apps, wait for it to cool, then charge again. If the lower part overheats, a damaged USB cable may be the cause; replace it with a Samsung-approved cable. Keep foreign materials such as metal objects, magnets and magnetic stripe cards away from a wireless charger (p. 156).
During use, the device may heat up temporarily when you do demanding tasks, including the initial setup or data restore, large downloads, extended gaming, extended video recording, streaming at maximum brightness, connecting to a TV, using Multi window, using the mobile hotspot, weak signal areas, roaming, or a damaged USB cable or multipurpose jack (pp. 156–157).
What to do: keep the software updated, restart the device, turn off Wi-Fi, GPS and Bluetooth when not needed, close apps running in the background, delete unneeded files or apps, and lower the brightness. If the device keeps overheating, stop using it for a while and contact a Samsung Service Centre if it continues (p. 157).
Warning: If the device overheats to a certain temperature, a warning message appears. Screen brightness and performance are limited, charging stops, running apps close, and calling and other features are limited except emergency calls. If a second message appears, the device turns off; do not use it until it cools below the specified level. Stop using the device if you feel uncomfortable from the heat. This feature is only available on supported models.
Source: manufacturer manual, p. 158.
Operating environment: do not store or use the device in very hot or cold places, in direct sunlight for long periods, in a hot car in summer, on an electric heating mat, or near heaters, microwaves, hot cooking equipment or high-pressure containers. Do not use a cable with damaged covering, or a damaged or malfunctioning charger or battery (p. 158).
Accessibility
Launch Settings and tap Accessibility. Recommended for you shows suggested features and those in use, and Turn off disables features in use (p. 160).
| Area | Features described | Page |
|---|---|---|
| TalkBack | Voice feedback. Turn on under Accessibility → TalkBack. To turn off, tap the switch and tap anywhere twice quickly. Includes a reading menu (three-finger swipe), image labels, customizable gestures, a braille keyboard and a tutorial. | 160–162 |
| Spoken assistance | Speak keyboard input aloud, audio description, Bixby Vision for accessibility (Scene describer, Object identifier, Text reader, Colour detector), and voice labels recorded to NFC-enabled labels. | 162–163 |
| Visibility enhancements | Display mode, high contrast theme, fonts and keyboard, Highlight buttons, Colour inversion, Colour adjustment, Colour filter, Remove animations, Reduce transparency and blur, Extra dim, Magnification, Magnifier, pointer size and colour, font and screen zoom. | 163–166 |
| Hearing enhancements | Live Transcribe, Live Caption, caption preferences, Sound detectors (baby crying, doorbell), hearing aid support, Amplify ambient sound, Adapt sound, Mute all sounds, Mono audio and left/right balance. | 167–169 |
| Interaction and dexterity | Universal switch, Assistant menu, Cursor, Voice Access, answering and ending calls, Interaction control, Touch and hold delay, Tap duration, Ignore repeated touches, Auto action after pointer stops, Sticky keys, Slow keys, Bounce keys. | 169–173 |
| Advanced settings | Quick launch for accessibility features, Flash notification, Time to take action, Installed apps. | 174 |
- Magnification shortcuts include the Accessibility button, pressing Volume Up and Down for 3 seconds, Side and Volume Up keys, and triple-tapping. Keyboards and the navigation bar cannot be magnified (pp. 165–166).
- While Sound detectors are on, voice recognition will not operate (p. 167).
- To turn off the universal switch, or to start and stop Interaction control, press the Side key and Volume Up key together (pp. 170, 172).
Troubleshooting
The manual asks you to try these solutions before contacting a Samsung Service Centre, notes that some may not apply to your device, and mentions Samsung Members for problem solving (p. 175).
| Problem | What the manual says to try | Page |
|---|---|---|
| Prompted for a Password, PIN, PUK or PIN2 | Password: the one you set for device lock. PIN: supplied with the SIM or USIM card; can be disabled with Lock SIM card. PUK: needed when the SIM is blocked, usually after repeated wrong PINs; supplied by your provider. PIN2: supplied with the SIM or USIM card; contact your provider. | 175 |
| Network or service error messages | Move away from weak-signal areas and try again. Some options need a subscription; contact your provider. | 175 |
| Device does not turn on | A completely discharged battery will not turn on. Fully charge it first. | 175 |
| Touchscreen slow or improper | Screen protectors or accessories, gloves, unclean hands, sharp objects, humidity or water can cause problems. Restart, update the software, and visit a Samsung Service Centre if the screen is scratched or damaged. | 176 |
| Device freezes or has a fatal error | Close apps or turn the device off and on. Force restart with the Side key and Volume Down key for more than 7 seconds. If that fails, perform a factory data reset. | 176 |
| Calls not connected | Check you are on the right cellular network and have not set call barring for the dialled or incoming number. | 176 |
| Others cannot hear you | Do not cover the microphone, keep it close to your mouth, and check an earphone is properly connected. | 177 |
| Echo during a call | Adjust the volume with the Volume key or move to another area. | 177 |
| Network or Internet drops, poor audio | Do not block the internal antenna. Weak signal, provider base station issues or moving can all cause drops. | 177 |
| Battery does not charge properly (Samsung-approved chargers) | Check the charger is connected properly, or visit a Samsung Service Centre to have the battery replaced. | 177 |
| Battery drains faster than when new | Very cold or hot temperatures reduce charge. GPS, games and the Internet use more power. The battery is consumable and its charge shortens over time. | 177 |
| Camera error messages | Charge the battery, free storage by moving or deleting files, and restart. Contact a Samsung Service Centre if it persists. | 178 |
| Photo quality poorer than preview | Quality varies with surroundings and technique. Dark areas, night or indoors can cause noise or poor focus. | 178 |
| Errors opening multimedia files | Free storage, check the file is not DRM-protected (or that you have the licence), and check the format is supported. Install an app that supports it for formats such as DivX or AC3. Files from other devices or the Internet may not work. | 178 |
| Bluetooth not working well | Make sure the other device is ready, within 10 m, and toggle Bluetooth off and on. If needed, reset network settings at General management → Reset → Reset network settings → Reset settings → Reset; registered information may be lost. | 179 |
| Brightness bar missing in the notification panel | Open the panel, drag it down, tap the menu icon → Quick panel layout and turn on Show brightness control above notifications. | 179 |
| No connection to a computer | Use a compatible USB cable and make sure the proper driver is installed and updated on the computer. | 179 |
| Cannot find your location | GPS signals may be blocked indoors. Set the device to use Wi-Fi or a mobile network. | 179 |
| Data lost | Always back up important data. Samsung is not responsible for data loss. | 180 |
| Small gap around the case | The manual says the gap is a necessary manufacturing feature, some minor rocking or vibration can occur, and the gap may widen slightly over time from friction. | 180 |
| Not enough storage | Delete cache using device care, or delete unused apps and files. | 180 |
| Home button missing | Drag up from the bottom of the screen to show the navigation bar. | 180 |
Factory data reset
Caution: A factory data reset deletes all data. Back up important data first.
- Launch the Settings app.
- Tap General management → Reset → Factory data reset.
- Tap Reset, then Delete all.
Source: manufacturer manual, p. 176.
Removing the battery
Warning: Do not try to remove the battery yourself. If it is not removed properly, it can damage the battery and device, cause personal injury and make the device unsafe. Contact an authorized service center for removal.
Source: manufacturer manual, p. 180.
Frequently Asked Questions
Is the Galaxy S20 Ultra waterproof?
The manual states the device received an IP68 rating under IEC 60529 in tests using fresh water at 1.5 m for 30 minutes. It lists liquids and conditions to avoid, such as salty water, soapy water and water moving with force, and says to dry the device completely before connecting a charger. The page does not separate the S20 Ultra from the other devices in the manual. (Source: manufacturer manual, p. 155.)
How do I take a screenshot on the Galaxy S20 Ultra?
Press the Side key and the Volume Down key at the same time, or swipe the edge of your hand across the screen. If swiping does not work, turn on Palm swipe to capture under Settings → Advanced features → Motions and gestures. Screenshots are saved in Gallery. (Source: manufacturer manual, pp. 10, 105.)
How do I restart the Galaxy S20 Ultra if it freezes?
Press and hold the Side key and the Volume Down key at the same time for more than 7 seconds. (Source: manufacturer manual, pp. 20, 176.)
Does the Galaxy S20 Ultra support eSIM and dual SIM?
The manual describes a nano-SIM card and an eSIM, and trays labeled single SIM and dual SIM. It says the eSIM may not be available depending on region, provider or model. To add an eSIM, go to Settings → Connections → SIM manager → Add eSIM. The PDF does not say which model codes have a dual SIM tray. (Source: manufacturer manual, pp. 15–17.)
Can I use a microSD card in the Galaxy S20 Ultra?
Yes. The manual describes inserting a microSD card in the SIM card / microSD card tray. It supports the FAT and exFAT file systems, and says some cards may not be compatible. Unmount the card in Settings before removing it. (Source: manufacturer manual, pp. 17–19.)
Can the Galaxy S20 Ultra charge wirelessly or charge other devices?
It has a built-in wireless charging coil, and a wireless charger is sold separately. It can also share power with another device that supports wireless charging through the Wireless power sharing quick panel button, and you can set a Battery limit. (Source: manufacturer manual, pp. 12–14.)
How do I factory reset the Galaxy S20 Ultra?
Go to Settings → General management → Reset → Factory data reset → Reset → Delete all. Back up your data first. This is the manual’s last-resort step for a frozen device. (Source: manufacturer manual, p. 176.)
Can I remove the battery in the Galaxy S20 Ultra?
The manual says to contact an authorized service center and not to remove the battery yourself, because improper removal can damage the device and cause injury. (Source: manufacturer manual, p. 180.)