| Field | Details |
| Document Title | Automatic Battery Charger |
| Document Type | Owner’s Manual |
| Brand Name | Schumacher Electric |
| Product Name | Automatic Battery Charger |
| Model Number(s) | SC1363 |
| PDF File Size | 492 KB |
| Number of Pages | 24 |
| Languages | English, Spanish, French |
Schumacher Automatic Battery Charger SC1363
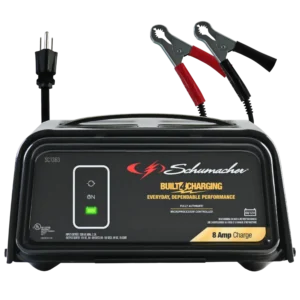
The Schumacher SC1363 is an automatic battery charger designed to charge and maintain compatible 6V and 12V lead-acid batteries. It features automatic voltage detection, adjustable charging current controlled by the charger, LED charging status indicators, and an automatic battery maintenance function.
The SC1363 supports standard (STD) and absorbent glass mat (AGM) rechargeable lead-acid batteries. It is designed for recommended battery capacities of 12Ah at 6V and 44–68Ah at 12V.
The charger operates from a grounded 120V AC electrical outlet and automatically detects whether a connected battery requires 6V or 12V charging. For 12V batteries, its rated charging output alternates between 8A for 120 seconds and 2A for 120 seconds. For 6V batteries, it provides a continuous 2A charging output.
When a battery reaches full charge, the SC1363 automatically switches to Maintain Mode to keep it charged. The charger also includes desulfation, reversed-clamp detection, aborted-charge protection, and an automatic start feature.
Product Features
The Schumacher SC1363 includes the following features:
- Automatic 6V and 12V battery charging.
- Automatic battery voltage detection.
- Charging support for standard (STD) lead-acid batteries.
- Charging support for AGM lead-acid batteries.
- 8A/2A timed charging output for 12V batteries.
- Continuous 2A charging output for 6V batteries.
- Automatic charging current adjustment.
- Automatic charging and battery maintenance.
- Float Mode Monitoring.
- Battery desulfation function.
- Automatic start after proper battery connection.
- Reversed battery clamp warning indicator.
- Yellow/orange charging status LED.
- Green fully charged and maintaining LED.
- Automatic aborted-charge protection.
- Battery clamps for connection to the battery.
- Grounded AC electrical power connection.
- Automatic charging shutoff when charging cannot be completed normally.
Technical Specifications
| Specification | Details |
| Brand | Schumacher Electric |
| Model Number | SC1363 |
| Product Type | Automatic Battery Charger |
| Input Voltage | 120V AC |
| Input Frequency | 60Hz |
| Input Current | 2.2A |
| Supported Battery Voltages | 6V and 12V |
| Voltage Selection | Automatic Voltage Detection |
| 12V Charging Output | 8A for 120 Seconds / 2A for 120 Seconds |
| 6V Charging Output | 2A Continuous |
| Supported Battery Types | Standard (STD) and AGM Lead-Acid |
| Recommended 6V Battery Capacity | 12Ah |
| Recommended 12V Battery Capacity | 44–68Ah |
| Automatic Charging Mode | Yes |
| Automatic Maintain Mode | Yes |
| Desulfation Mode | Yes |
| Reverse-Polarity Indicator | Yes |
| Aborted-Charge Protection | Yes |
| AC Power Connection | Grounded Plug |
| Warranty | 2-Year Limited Warranty |
The SC1363 automatically adjusts charging current based on the connected battery. Charging current and battery voltage do not require manual selection.
Parts and Components
The Schumacher SC1363 includes electrical connections, battery clamps, and a front control panel with LED status indicators.
Main Components and Functions
| Component | Function |
| Charger Housing | Contains the charging system and electrical components |
| AC Power Cord and Plug | Connects the charger to a grounded 120V AC outlet |
| Positive Battery Clamp (Red) | Connects to the battery’s positive terminal |
| Negative Battery Clamp (Black) | Connects to the battery’s negative terminal or vehicle grounding point |
| DC Output Cables | Carry charging current from the charger to the battery |
| LED Control Panel | Displays charging status and connection warnings |
| Reversed Clamps LED | Indicates incorrect battery clamp polarity |
| Charging LED | Indicates active charging or aborted charging |
| Charged/Maintaining LED | Indicates that charging is complete and battery maintenance is active |
Control Panel and LED Indicator Guide
The SC1363 uses three LED indicators to communicate battery connection status, charging activity, and charging completion.
Schumacher SC1363 LED Indicator Meanings
| LED Indicator | Color or Behavior | Meaning |
| CLAMPS REVERSED | Red, Flashing | Battery clamps are connected with reversed polarity |
| Charging | Yellow/Orange, Steady | The charger is charging the connected battery |
| Charging | Yellow/Orange, Flashing | The charger has entered Aborted Charge Mode |
| CHARGED/MAINTAINING | Green, Steady | Battery is fully charged and Maintain Mode is active |
Red Flashing Clamps Reversed LED
A flashing red CLAMPS REVERSED LED means the positive and negative battery connections are reversed.
Disconnect the charger from the AC electrical outlet before correcting the clamp connections.
Reconnect the clamps using the proper polarity and grounding procedure.
Yellow/Orange Charging LED
A steady yellow/orange charging indicator means the charger is actively charging the battery.
The SC1363 automatically controls the charging current according to the connected battery.
Flashing Yellow/Orange Charging LED
A flashing yellow/orange charging indicator means charging has been aborted.
This can occur when the battery does not accept a normal charge or when desulfation fails.
The charger stops supplying charging current when the charging process is aborted.
Do not continue attempting to charge the battery. Have it checked and replace it if necessary.
Green Charged/Maintaining LED
The green CHARGED/MAINTAINING indicator illuminates when the battery reaches full charge.
At this point, the charger automatically changes to Maintain Mode.
In Maintain Mode, the charger supplies a small amount of current when necessary to keep the battery fully charged.
Important Safety Instructions
WARNING: Lead-acid batteries generate explosive gases during normal operation. Sparks, flames, and incorrect electrical connections can cause a battery explosion.
All safety precautions must be followed before connecting, operating, or disconnecting the SC1363 battery charger.
General Safety Precautions
- Keep the charger out of children’s reach.
- Do not expose the charger to rain or snow.
- Use only accessories recommended or sold by the manufacturer.
- Do not operate the charger with a damaged power cord or plug.
- Do not operate a charger that has been dropped, struck, or otherwise damaged.
- Do not disassemble the charger.
- Repairs must be performed by qualified service personnel.
- Disconnect the charger from AC power before cleaning or maintenance.
- Disconnect the power cord by pulling the plug rather than the cord.
- Do not allow the positive and negative battery clamps to touch each other.
- Keep the charging area well ventilated.
- Follow the vehicle and battery manufacturers’ safety recommendations.
Battery Explosion Precautions
To reduce the risk of an explosion:
- Never smoke near the battery or engine.
- Keep sparks and open flames away from the battery.
- Do not drop metal tools onto the battery.
- Check that battery connections are correct before supplying AC power.
- Follow the battery manufacturer’s recommended charging precautions.
- Never attempt to charge a frozen battery.
Personal Protection
When working near a lead-acid battery:
- Wear complete eye protection.
- Wear suitable protective clothing.
- Keep another person nearby who can provide assistance.
- Remove rings, watches, bracelets, necklaces, and other metal jewelry.
- Keep fresh water and soap available.
- Avoid touching the eyes while working around the battery.
A lead-acid battery can generate enough short-circuit current to heat or weld metal jewelry, causing severe burns.
Battery Acid Safety
Battery acid can cause serious injuries.
If battery acid contacts the skin or clothing, wash the affected area immediately with soap and water.
If battery acid enters the eyes, flush them immediately with cold running water for at least 10 minutes and obtain medical attention immediately.
Battery Compatibility Safety
The SC1363 is intended for charging rechargeable lead-acid batteries of the following types:
- Standard (STD) lead-acid.
- AGM lead-acid.
The manufacturer’s recommended battery capacities are 12Ah for 6V batteries and 44–68Ah for 12V batteries.
Do not use the SC1363 to charge dry-cell batteries commonly used in household appliances.
These batteries may burst and cause injury or property damage.
Frozen Battery Warning
Never charge a frozen battery.
Vehicle Starting Warning
Do not start the vehicle while the charger is connected to an AC electrical outlet.
Attempting to start the engine while the charger is connected to AC power may damage the charger.
Before First Use
Before using the Schumacher SC1363, inspect the charger, prepare the battery, and confirm that the electrical supply is suitable.
Initial Preparation
- Inspect the battery charger for visible damage.
- Check the AC power cord, plug, battery cables, and clamps.
- Remove all cord wraps and fully uncoil the cables.
- Place the charger on a dry, nonflammable surface.
- Keep the charging area well ventilated.
- Confirm that the battery is a compatible 6V or 12V rechargeable lead-acid battery.
- Inspect and clean the battery terminals.
- Keep the charger disconnected from AC power while attaching the battery clamps.
Preparing a Battery for Charging
Battery Terminal Preparation
The battery terminals should be clean before charging.
Remove corrosion carefully and prevent corrosion particles from contacting the eyes.
Checking Battery Electrolyte Levels
For batteries with removable cell caps, add distilled water to each cell until the electrolyte reaches the level specified by the battery manufacturer.
Do not overfill the cells.
For sealed batteries without removable cell caps, including valve-regulated lead-acid batteries, follow the battery manufacturer’s charging instructions.
Checking Battery Voltage
Determine the battery voltage from its specifications or the vehicle owner’s manual.
The SC1363 automatically detects whether the connected battery requires 6V or 12V charging.
Battery Charging Ventilation
Keep the area around the battery well ventilated during charging.
Battery gases must not be allowed to accumulate around the charger.
Selecting a Safe Charger Location
The SC1363 must be positioned away from the battery as far as its DC charging cables permit.
Placement Requirements
- Place the charger on a dry, nonflammable surface.
- Keep the charging area well ventilated.
- Do not position the charger directly above the battery.
- Do not place a battery on top of the charger.
- Do not allow battery acid to drip onto the charger.
- Do not operate the charger in an enclosed area with restricted ventilation.
Battery gases can corrode or damage the charger.
AC Power Supply and Grounding Requirements
The Schumacher SC1363 is designed for a nominal 120V AC electrical circuit.
The charger has a grounded electrical plug.
Electrical Requirements
| Requirement | Specification |
| Nominal AC Voltage | 120V |
| AC Frequency | 60Hz |
| Input Current | 2.2A |
| Plug Type | Grounded |
| Outlet Requirement | Properly Installed and Grounded |
The power plug must be inserted into a properly installed and grounded electrical outlet that complies with applicable local electrical codes.
Grounding Safety
Do not modify the AC power cord or plug.
If the plug does not fit the electrical outlet, have a suitable grounded outlet installed by a qualified electrician.
Do not operate the charger from an ungrounded electrical system.
Extension Cord Requirements
An extension cord should be used only when necessary.
The extension cord must have:
- Plug pins matching the charger’s plug.
- Proper electrical wiring.
- No damaged connections.
- Adequate conductor size for the charger’s electrical input.
Recommended Extension Cord Wire Sizes
| Extension Cord Length | Minimum Wire Size |
| 25 Feet | 18 AWG |
| 50 Feet | 16 AWG |
| 100 Feet | 16 AWG |
| 150 Feet | 14 AWG |
AWG stands for American Wire Gauge.
An unsuitable extension cord can increase the risk of fire or electric shock.
How to Connect the Schumacher SC1363 to a Vehicle Battery
The battery clamps must be connected according to the vehicle’s electrical grounding system.
Most vehicles use a negative-ground system.
Identifying Battery Terminals
Battery terminals are identified by polarity markings.
| Terminal | Markings |
| Positive | POS, P, + |
| Negative | NEG, N, – |
The positive battery terminal usually has a larger diameter than the negative terminal.
Connection Precautions
Before connecting the charger:
- Turn off all vehicle accessories.
- Keep the charger disconnected from AC power.
- Route the AC and DC cables away from moving engine components.
- Keep cables away from fan blades, belts, and pulleys.
- Identify the battery’s positive and negative terminals.
- Determine whether the vehicle has a negative-ground or positive-ground electrical system.
Connecting to a Negative-Grounded Vehicle
Most vehicles use a negative-ground electrical system.
Connection Instructions
- Connect the positive red charger clamp to the battery’s positive terminal marked POS, P, or +.
- Connect the negative black charger clamp to a heavy-gauge metal section of the vehicle chassis or engine block away from the battery.
- Check that both connections are secure.
Do not connect the black clamp to:
- The carburetor.
- Fuel lines.
- Thin sheet-metal body parts.
Use a suitable heavy metal section of the frame or engine block.
Disconnecting After Charging
- Disconnect the charger from the AC electrical outlet.
- Remove the negative black clamp from the vehicle chassis.
- Remove the positive red clamp from the battery terminal.
Connecting to a Positive-Grounded Vehicle
Some vehicles use a positive-ground electrical system.
Connection Instructions
- Connect the negative black charger clamp to the battery’s negative terminal marked NEG, N, or –.
- Connect the positive red charger clamp to a heavy-gauge metal section of the vehicle chassis or engine block away from the battery.
- Check that both connections are secure.
Do not attach the chassis clamp to fuel lines, the carburetor, or thin sheet-metal body parts.
Disconnecting After Charging
- Disconnect the charger from AC power.
- Remove the clamp connected to the vehicle chassis.
- Remove the clamp attached to the battery terminal.
How to Charge a Battery Installed in a Vehicle
The SC1363 can charge a compatible battery without removing it from the vehicle.
Charging Instructions
- Turn off all vehicle accessories.
- Keep the vehicle hood open.
- Clean the battery terminals.
- Place the charger on a dry, nonflammable surface.
- Route the AC and DC cables away from fan blades, belts, pulleys, and other moving parts.
- Connect the charger clamps using the correct procedure for the vehicle’s grounding system.
- Plug the charger into a grounded 120V AC electrical outlet.
- The charger automatically detects the battery voltage and begins charging.
- The yellow/orange charging LED illuminates during charging.
- When charging is complete, the green CHARGED/MAINTAINING LED illuminates.
- Disconnect the charger from AC power.
- Remove the clamp from the vehicle chassis.
- Remove the remaining clamp from the battery terminal.
Important: Do not attempt to start the vehicle while the charger is connected to the AC outlet.
How to Charge a Battery Outside the Vehicle
The SC1363 can also charge compatible lead-acid batteries that have been removed from a vehicle.
Battery Connection Requirements
When charging a battery outside a vehicle, the manual requires an additional insulated battery cable.
| Item | Requirement |
| Additional Battery Cable | Insulated Battery Cable |
| Minimum Cable Length | 24 Inches |
| Cable Gauge | 6 AWG |
| Connection Point | Negative Battery Terminal |
Charging Instructions
- Place the battery in a well-ventilated area.
- Clean the battery terminals.
- Identify the positive and negative battery terminals.
- Attach a battery cable measuring at least 24 inches long and 6 AWG to the battery’s negative terminal.
- Connect the positive red charger clamp to the battery’s positive terminal.
- Position the operator and the free end of the additional cable as far from the battery as practical.
- Connect the negative black charger clamp to the free end of the additional cable.
- Do not face the battery while making the final connection.
- Plug the charger into a grounded AC electrical outlet.
- Allow the charger to complete its automatic charging process.
- When the green CHARGED/MAINTAINING LED illuminates, disconnect the charger from AC power.
- Disconnect the negative connection first, as far from the battery as practical.
- Disconnect the positive clamp.
Charging Marine Batteries
A marine battery must be removed from the boat and charged on shore.
Charging a battery on board a boat requires equipment specifically designed for marine use.
How the SC1363 Automatic Charging System Works
The Schumacher SC1363 automatically detects battery voltage and controls the charging current.
Automatic Voltage Detection
The charger recognizes whether a properly connected battery requires 6V or 12V charging.
There is no manual voltage selection procedure.
Automatic Charging Current
The charging current is automatically adjusted based on the battery.
The rated output is:
| Battery Voltage | Charging Output |
| 12V | 8A for 120 Seconds / 2A for 120 Seconds |
| 6V | 2A Continuous |
The charger is intended for compatible battery charging and maintenance rather than industrial applications.
Schumacher SC1363 Charging Modes
The SC1363 includes automatic charging, battery maintenance, desulfation, and aborted-charge functions.
Automatic Charging Mode
When the battery is correctly connected and the charger receives AC power, the charging process begins automatically.
The charger adjusts the charging current according to the connected battery.
The yellow/orange charging LED illuminates while charging is active.
When charging is complete, the charger automatically switches to Maintain Mode.
Maintain Mode (Float Mode Monitoring)
When the green CHARGED/MAINTAINING LED illuminates, the battery is fully charged and Maintain Mode is active.
In this mode, the charger supplies a small amount of current when necessary to keep the battery charged.
Maintaining a Battery for Extended Periods
The SC1363 can maintain healthy 6V and 12V batteries for extended periods.
However, occasional monitoring of the battery and charging process is required.
Problems such as vehicle electrical faults, battery defects, incorrect connections, or unexpected electrical loads may cause excessive current draw.
Maintain Mode Aborted Charge
If the charger must continuously deliver its maximum maintenance current for 12 hours, it enters Aborted Charge Mode.
This may occur because:
- The battery has an electrical load connected.
- The battery is defective.
Remove any electrical loads connected to the battery.
If no electrical loads are present, have the battery checked or replaced.
Desulfation Mode
The SC1363 can perform a desulfation process when required during charging.
The desulfation process may take approximately 8–10 hours.
If desulfation is unsuccessful, the charger aborts the charging process.
The yellow/orange charging LED flashes to indicate the aborted condition.
Aborted Charge Mode
If charging cannot be completed normally, the charger stops charging and shuts off its output.
The yellow/orange charging indicator flashes.
Do not continue attempting to charge the battery.
Have the battery checked and replace it if necessary.
Schumacher SC1363 Battery Charging Times
Charging time depends on the battery’s capacity, age, condition, and discharge level.
The owner’s manual includes a general charging-time reference chart based on batteries that are approximately 50% discharged.
Battery Charging Time Reference
| Battery Application | Battery Size | 6A | 8A | 10A | 15A |
| Powersports | 6Ah | 2 Hours | 1.5 Hours | 1.5 Hours | 1 Hour |
| Powersports | 32Ah | 5 Hours | 4.5 Hours | 4 Hours | 2 Hours |
| Automotive | 300 CCA | 4 Hours | 3.5 Hours | 3 Hours | 1.5 Hours |
| Automotive | 1000 CCA | 10 Hours | 8 Hours | 7 Hours | 4 Hours |
| Marine | 50Ah | 5 Hours | 4 Hours | 3.5 Hours | 2 Hours |
| Marine | 105Ah | 11 Hours | 10 Hours | 8 Hours | 5 Hours |
Note: This is the general charging-time reference chart printed in the manual, not a list of selectable current settings on the SC1363. The SC1363 automatically controls its charging output using the 12V 8A/2A timing arrangement or continuous 6V 2A output. Its specified battery compatibility limits must still be followed.
Actual charging times may vary with battery age and condition.
Automatic Start Feature
The SC1363 uses an automatic start function.
The charger does not supply charging current through its battery clamps until a battery is correctly connected.
How Auto-Start Works
- The charger is connected to an appropriate battery.
- The charger checks the battery connection.
- The charging system begins supplying current after detecting a proper connection.
The clamps do not spark when touched together because the charger does not energize them without a correct battery connection.
The clamps must still be handled according to the safety instructions.
Cleaning and Maintenance Instructions
The SC1363 requires basic cleaning and inspection to maintain operating condition.
Cleaning the Battery Clamps
After every charging session:
- Disconnect the charger from AC power.
- Remove the battery clamps using the correct disconnection procedure.
- Wipe away any battery fluid that may have contacted the clamps.
- Clean the clamps to prevent corrosion.
Cleaning the Charger Housing
Use a soft cloth to clean the external housing occasionally.
Removing dust and dirt helps maintain the housing’s condition and reduces corrosion.
Power Cord and Cable Maintenance
Inspect the AC power cord and DC charging cables for damage.
Do not operate the charger with damaged electrical connections.
Replace damaged components through qualified service personnel.
Storage Instructions
The SC1363 should be stored indoors in a cool, dry location.
Proper Storage Procedure
- Disconnect the charger from the AC electrical outlet.
- Disconnect the charger from the battery.
- Coil the AC and DC cables neatly.
- Store the charger in an upright position.
- Keep it in a cool, dry indoor location.
Battery Clamp Storage
Do not store the battery clamps:
- Clipped together.
- Attached to the carrying handle.
- In contact with metal objects.
- Attached to or around the cables.
Proper cable and clamp storage helps prevent accidental damage.
Troubleshooting Guide
The following troubleshooting procedures address the main operating conditions identified for the Schumacher SC1363.
Schumacher SC1363 Troubleshooting Table
| Problem | Possible Cause | Recommended Solution |
| Battery Clamps Do Not Spark When Touched Together | Automatic start protection is active | This is normal; the charger does not supply current until a battery is correctly connected |
| All Three LEDs Illuminate for 2 Seconds and Turn Off | Charger has been connected to AC power | This is normal |
| Charger Does Not Turn On | AC outlet is not supplying power | Check the outlet’s fuse or circuit breaker |
| Charger Does Not Turn On | Loose or poor electrical connection | Check the power cord and extension cord connections |
| Charger Does Not Turn On | Defective battery | Have the battery checked |
| Unable to Select 6V or 12V | Automatic voltage detection controls charging voltage | This is normal; voltage selection is automatic |
| Yellow/Orange LED Is Flashing | Battery is not accepting a normal charge | Stop charging and have the battery checked or replaced |
| Red Clamps Reversed LED Is Flashing | Battery clamps have reversed polarity | Disconnect AC power and correct the clamp connections |
Schumacher SC1363 Not Turning On
If the SC1363 does not turn on after being connected, check the following conditions.
AC Outlet Has No Power
Check whether the electrical outlet is supplying power.
Inspect the fuse or circuit breaker serving the outlet.
Loose Electrical Connections
Check the charger’s AC power cord and any extension cord being used.
Make sure the plugs fit securely and are in good condition.
Defective Battery
If the AC power supply and connections are working correctly, the connected battery may be defective.
Have the battery checked.
Schumacher SC1363 Yellow Light Flashing
A flashing yellow/orange charging LED means the charger has entered Aborted Charge Mode.
The battery may not be accepting a normal charge.
Corrective Action
- Stop charging the battery.
- Disconnect the charger from AC power.
- Disconnect the battery clamps safely.
- Have the battery checked.
- Replace the battery if necessary.
Do not continue attempting to charge a battery after charging has been aborted.
Schumacher SC1363 Red Light Flashing
The red CLAMPS REVERSED LED flashes when battery polarity is reversed.
Corrective Action
- Disconnect the charger from the AC electrical outlet.
- Check the battery terminal markings.
- Check which terminal is connected to the vehicle chassis.
- Reconnect the clamps according to the correct grounding procedure.
- Restore AC power after the connections are correct.
Schumacher SC1363 Green Light On
A steady green CHARGED/MAINTAINING LED indicates that the battery has reached full charge.
The charger has entered Maintain Mode and supplies a small amount of current when required to maintain the battery.
Occasional monitoring is necessary, even during extended maintenance charging.
All Three LEDs Flash or Illuminate Briefly
When the charger is plugged into AC power, all three LEDs may illuminate for approximately 2 seconds and then turn off.
This is a normal startup condition.
Schumacher SC1363 Cannot Select 6V or 12V
The SC1363 automatically detects battery voltage.
It does not require manual selection between 6V and 12V charging.
The charger automatically identifies the connected battery voltage and adjusts its charging process.
Schumacher SC1363 Battery Not Charging
If the battery does not charge:
- Check that the AC electrical outlet is working.
- Inspect the power cord and extension cord connections.
- Check that the battery clamps are connected correctly.
- Observe the LED indicators.
- If the yellow/orange charging LED flashes, stop charging and have the battery checked.
A defective battery may need replacement.
Schumacher SC1363 Maintain Mode Stops
If the charger enters Aborted Charge Mode during maintenance, it may be supplying excessive maintenance current for an extended period.
The charger enters Aborted Charge Mode if it must supply its maximum maintenance current continuously for 12 hours.
Corrective Action
- Check whether electrical loads are connected to the battery.
- Remove the connected loads.
- If no loads are connected, have the battery checked.
- Replace the battery if necessary.
Limited Warranty
Schumacher Electric Corporation provides a two-year limited warranty for the SC1363 battery charger.
Warranty Information
| Warranty Detail | Information |
| Manufacturer | Schumacher Electric Corporation |
| Product | SC1363 Automatic Battery Charger |
| Warranty Type | Limited Warranty |
| Warranty Duration | 2 Years |
| Warranty Start Date | Original Retail Purchase Date |
| Eligible Purchaser | Original Retail Purchaser |
| Transferability | Nontransferable |
| Covered Defects | Defective Materials or Workmanship Under Normal Use and Care |
| Warranty Remedy | Repair or Replacement at Manufacturer’s Discretion |
| Warranty Validity in Mexico | Not Valid |
Warranty Repair or Replacement
If the charger develops a covered defect during the warranty period, Schumacher Electric Corporation may repair the unit or replace it with a new or reconditioned charger.
The manufacturer determines whether repair or replacement is appropriate.
The original purchaser must provide proof of purchase and prepay shipping charges when sending the unit to the manufacturer or its authorized representatives.
Warranty Exclusions
The limited warranty may be void if the charger:
- Is misused.
- Is handled carelessly.
- Is repaired or modified by anyone other than the manufacturer.
- Is resold through an unauthorized retailer.
- Has a warranty label removed where removal voids coverage.
Accessories that are not manufactured and approved by Schumacher Electric Corporation are excluded from the manufacturer’s accessory warranty coverage.
The warranty contains limitations on other warranties and certain types of damages. Applicable legal rights may vary by state.
Warranty Registration
The charger may be registered online at:
The warranty registration card should be submitted within 30 days of purchase.
The original purchase receipt must be retained because it is required for warranty claims.
Customer Support Information
Schumacher Electric Corporation provides assistance with charging problems, troubleshooting, repairs, returns, and warranty service.
Customer Support Details
| Service | Contact Information |
| Manufacturer | Schumacher Electric Corporation |
| Customer Support Phone | 1-800-621-5485 |
| Customer Support Email | services@schumacherelectric.com |
| Customer Support Website | www.batterychargers.com |
| Support Days | Monday–Friday |
| Support Hours | 7:00 AM–5:00 PM CST |
| Manufacturer Address | 801 Business Center Drive, Mount Prospect, IL 60056-2179, USA |
Repair and Return Instructions
- Review the troubleshooting instructions.
- Contact Schumacher customer service if the operating problem continues.
- Request repair or return assistance.
- Obtain a Return Merchandise Authorization (RMA) number.
- Follow the manufacturer’s repair and return instructions.
Important: Do not ship the charger until Schumacher Electric Corporation Customer Service has provided an RMA number.
Frequently Asked Questions
1. Does the Schumacher SC1363 charge both 6V and 12V batteries?
Yes. The Schumacher SC1363 automatically detects and charges compatible 6V and 12V standard (STD) or AGM lead-acid batteries. The recommended battery capacities are 12Ah for 6V batteries and 44–68Ah for 12V batteries. No manual voltage selection is required.
2. How many amps does the Schumacher SC1363 battery charger provide?
The SC1363 uses an automatic charging system. For 12V batteries, its rated output alternates between 8A for 120 seconds and 2A for 120 seconds. For 6V batteries, the charger provides a continuous 2A output. The charger controls the charging current automatically.
3. What does a flashing yellow light mean on the Schumacher SC1363?
A flashing yellow/orange charging LED means the charger has entered Aborted Charge Mode. The connected battery may not be accepting a normal charge, or desulfation may have failed. Charging stops automatically. The battery should be checked and replaced if necessary.
4. How do I know when the Schumacher SC1363 battery is fully charged?
The green CHARGED/MAINTAINING LED illuminates when the battery reaches full charge. The charger then automatically switches to Maintain Mode, supplying a small amount of current when needed to keep the battery charged.
5. Can the Schumacher SC1363 stay connected to a battery for maintenance?
Yes. The SC1363 has automatic Maintain Mode for keeping a healthy 6V or 12V battery charged over extended periods. However, the manufacturer recommends occasional monitoring because battery defects, improper connections, or electrical problems may cause excessive current draw.
6. Why are all three lights turning on and then off on my Schumacher SC1363?
When the SC1363 is connected to AC power, all three LED indicators may illuminate for approximately 2 seconds before turning off. This is a normal startup condition and does not indicate a charger problem.
7. Why can’t I manually select 6V or 12V on the Schumacher SC1363?
The SC1363 includes automatic voltage detection. It identifies whether the connected battery is a 6V or 12V battery and adjusts the charging process accordingly. Manual voltage selection is not required.
8. Can the Schumacher SC1363 charge an AGM battery?
Yes. The SC1363 supports compatible AGM lead-acid batteries as well as standard lead-acid batteries. The battery must meet the charger’s supported voltage and recommended capacity requirements. The charger must not be used for household dry-cell batteries or frozen batteries.