
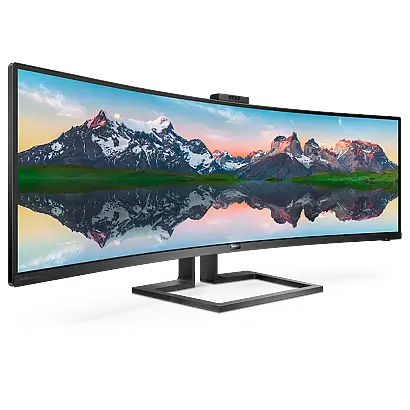
The Philips Brilliance 499P9 is a curved, super-wide LCD monitor with a 32:9 aspect ratio and a native resolution of 5120 x 1440. It combines a VA panel and W-LED backlight with two HDMI 2.0 inputs, DisplayPort 1.4 and a USB-C input that can deliver up to 90 W to a laptop. Built-in extras include a USB hub, Gigabit Ethernet, 5 W x 2 speakers, a pop-up 2.0-megapixel webcam with Windows Hello face sign-in, a KVM switch for two computers and side-by-side (PBP) viewing. The 499P9H1 version adds a remote control.
Product Specifications
| Item | Detail |
| Panel | VA, W-LED backlight, 48.8″ (124 cm) |
| Pixel pitch | 0.233 x 0.233 mm |
| Native resolution | 5120 x 1440 |
| Refresh rate | 48–70 Hz vertical (60 Hz recommended) |
| Viewing angle | 178° / 178° at C/R > 10 (typ.) |
| Colors | 1.07 billion (8-bit + FRC) |
| HDR | PC HDR400 certification (DP/HDMI) |
| Video inputs | 2x HDMI 2.0, 1x DisplayPort 1.4, 1x USB-C |
| USB | 1x USB-B in, 3x USB-A out (one BC 1.2 fast charge, up to 7.5 W), USB 3.2 Gen2 10 Gbps on USB-C/USB-A |
| USB-C power | USB PD 3.0, up to 90 W |
| Network / audio | RJ-45 (10/100/1000M), headphone out, 5 W x 2 speakers |
| Stand | Tilt -5° to +15°, swivel ±20°, height 130 mm |
| VESA | 100 x 100 mm |
| Size with stand (W x H x D) | 1194 x 568 x 303 mm |
| Weight | 15.30 kg with stand, 11.00 kg without |
| Power | Built-in supply, 100–240 VAC, 50–60 Hz |
| Typical consumption | About 82 W on; under 0.3 W in sleep; 0 W with the power switch off |
| Operating range | 0–40°C, 20–80% humidity |
What’s in the Box
The box holds the monitor with its stand neck and base, a Quick Start guide and a power cable. DisplayPort, HDMI, USB C-C, USB C-A, USB A-B and USB C-C/A cables are also pictured, but they vary by country. The 499P9H1 also includes a remote control and two zinc-carbon AAA batteries (PDF p. 7).
Assembly and Connections
Attaching the stand
- Lay the monitor face down on a cushion to protect the screen.
- Hold the neck with both hands and press it onto the VESA mount area until the latches lock.
- Tighten the mounting screws with a screwdriver.
The monitor is curved, so put protective material under it and never press on the screen while attaching or removing the stand (PDF p. 7).
Connecting a computer
- Plug the power cable firmly into the back of the monitor.
- Turn off the computer and unplug it.
- Connect the signal cable (USB-C, HDMI or DisplayPort) to the computer.
- Plug in both power cables, then turn on the computer and monitor.
If you use HDMI or DisplayPort, add a USB C-A or USB A-B cable from the computer to the monitor’s “USB C” or “USB up” port so the keyboard and mouse plugged into the monitor reach the computer. If they don’t respond, open the OSD, choose USB Setting > KVM > Auto (PDF p. 9).
The USB ports switch off in standby, so set USB Standby Mode to ON if you want them to stay active or charge a phone while the monitor sleeps. Reset the setting after any factory reset. For the Ethernet port, install the USB C RJ45 driver from Philips support, then restart the computer. If the connection feels slow, select USB 3.0 in the OSD (PDF pp. 9–10).
Changing the angle
Tilt and swivel by holding only the bezel. Don’t tilt the screen down past -5°, which can damage the panel and isn’t covered by the warranty (PDF p. 15).
Controls and On-Screen Menu
The front bezel has buttons for power, the OSD menu and confirmation, menu adjustment, a user key, input source, back and SmartImage (PDF p. 11). The remote on the 499P9H1 adds brightness, volume and mute keys.
The OSD menu includes LowBlue Mode, Input, Picture, PBP, Audio, Color, Language, OSD Settings, USB Setting and Setup. Picture holds brightness, contrast, gamma and HDR, and Color offers 5000K–11500K temperatures, sRGB and a custom RGB mix. Reset in Setup restores factory settings.
To assign the user key, go to OSD Settings > User Key and pick Audio Source, Volume, Input, Brightness, KVM or HDMI EDID Switch. To lock or unlock the controls, hold the menu/OK button for 10 seconds (PDF p. 40).
Resolution and Display Features
Use 5120 x 1440 at 60 Hz for best results. The panel also accepts 70 Hz over a digital input. If the monitor shows “No signal” on HDMI, the source may not support that resolution. Press the user key (default: HDMI EDID Switch) and select 2. For full 5120 x 1440 on HDMI, set the matching HDMI EDID Switch to 1, provided the source supports it (PDF pp. 15, 30).
SmartImage cycles through EasyRead, Office, Photo, Movie, Game, Economy, LowBlue Mode, SmartUniformity and Off.
HDR in Windows 10 needs Windows HD Color enabled in Display settings. If you turn HDR off, do it on the source device too, because mismatched settings can lower picture quality (PDF p. 26).
Smart Power allows up to 90 W over USB-C when switched on in the Setup menu. Output depends on brightness: 90 W at 0–20, 85 W at 21–60 and 80 W at 61–100. With Smart Power off, USB-C is limited to 65 W (PDF p. 25).
Webcam, KVM and PBP
The pop-up webcam includes a microphone, infrared sensors and an activity light. Windows Hello face sign-in needs Windows 10; on other systems the camera works without it, and Windows 7 needs a driver. Push the camera forward, connect a USB cable to the “USB C” port, then set up a PIN and Hello under Windows Settings > Accounts > Sign-in options. If you use the “USB up” port, set KVM to USB up (PDF pp. 16–17).
The KVM switch lets two computers share one keyboard and mouse. Connect both through USB C and USB up, then choose Auto, USB C or USB up under KVM (PDF pp. 18–19).
For PBP, go to PBP > PBP Mode > PBP, then choose the second source with PBP Input or exchange the two with Swap (PDF pp. 19–20).
Safety and Care
- Keep the monitor out of direct sunlight and away from heat, oil, dust and moisture. Don’t cover the vents.
- Use only a Philips-approved power cable and the specified power source. Wait 6 seconds after unplugging before reconnecting.
- Connect the USB-C port only to equipment with a fire-resistant enclosure meeting IEC 62368-1 or IEC 60950-1.
- Lift the monitor by the frame, never by pressing on the panel, and leave the case to qualified service staff.
- If liquid or objects get inside, switch off and unplug it immediately. If you see smoke or sparks, unplug it and contact Philips customer care without troubleshooting.
- Unplug before cleaning with a slightly damp cloth, and don’t use alcohol or ammonia-based cleaners (PDF p. 4).
- To avoid image retention, use a moving screen saver. Burn-in isn’t covered by the warranty (PDF p. 5).
- Take a 5–10 minute break after 50–60 minutes of use to reduce eye strain.
Remote batteries should match the polarity marks, and old and new or different types shouldn’t be mixed. Remove dead batteries promptly (PDF p. 12).
Troubleshooting
- No picture, power light off: Check both ends of the power cable and press the power switch.
- No picture, white light on: Make sure the computer is on and the signal cable is seated. Look for bent pins. Power-saving mode may be active.
- Blurry or jagged text: Set the computer to the native resolution.
- Dull or dark image: Adjust brightness and contrast in the OSD.
- Ghost image after power off: This image retention often fades after the monitor rests for a while.
- Power light too bright: Adjust Power LED in Setup, where available.
- Colored dots: A few are normal for LCD panels (see the dead-pixel question below).
The Auto, Phase and Clock fixes listed in the manual apply only to VGA mode (PDF pp. 36–37).
Frequently Asked Questions
Why does the screen say to use 5120 x 1440 at 60 Hz?
That is the native, recommended mode. Set it in Windows display properties and, if needed, restore the 60 Hz refresh rate.
Why is there no picture from my Blu-ray player or other HDMI device?
The device probably doesn’t support 5120 x 1440. Press the user key (default HDMI EDID Switch) and choose 2. If the key is assigned elsewhere, switch to another input, change HDMI EDID Switch to 2 in the OSD, then switch back to HDMI (PDF p. 40).
How do I use one keyboard and mouse with two computers?
Connect both computers by USB (USB C and USB up) and pick the active one under KVM in the OSD. Auto, USB C and USB up are the options.
Why do the speakers stay silent on my MacBook?
Open the OSD, choose Audio, and select Audio Recover (PDF p. 41).
Why does a PBP window flicker?
The sub-window source probably uses interlaced timing. Change that source to progressive timing (PDF p. 41).
How many dead pixels are acceptable?
Philips allows up to 2 bright-dot defects and up to 10 dark-dot defects, with no more than 10 in total. Two dark defects must be at least 15 mm apart. Units beyond these limits qualify for repair or replacement (PDF p. 34).
What does the warranty cover?
The warranty applies to normal use with the original invoice or receipt. Extended warranty adds 1, 2 or 3 years and must be bought within 30 days of purchase. Spare parts are available for at least three years after purchase (PDF pp. 3, 35).