
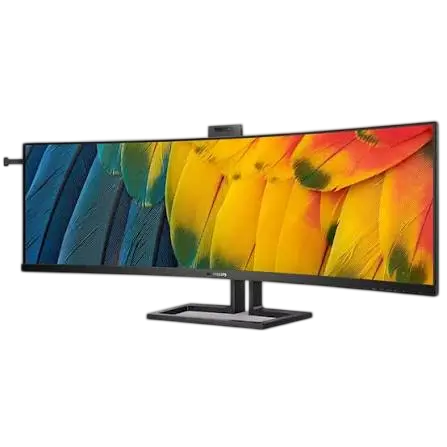
The Philips Curved Business Monitor 6000 Series is a 44.5-inch, 32:9 super-wide curved display built for office multitasking. Its VA panel has a native resolution of 5120 x 1440, and the monitor is VESA DisplayHDR 400 certified. It doubles as a docking station: USB-C input with up to 96 W typical power delivery, a built-in Gigabit Ethernet port, a USB hub, and an integrated KVM switch let you run two computers from one keyboard and mouse. MultiView shows two sources at once, and the 45B1U6900CH adds a pop-up 5-megapixel Windows Hello webcam, a second USB-C upstream port, and noise cancelling for calls.
Product Specifications
| Feature | Details |
|---|---|
| Panel | 44.5-inch VA, W-LED backlight, 32:9 |
| Resolution | 5120 x 1440 @ 60 Hz native; 75 Hz maximum |
| Contrast / viewing angle | 3000:1 typical; 178° horizontal and vertical |
| HDR | VESA DisplayHDR 400 |
| Video inputs | 2 x HDMI 2.0, 1 x DisplayPort 1.4, USB-C with DP Alt mode (one port on the C model, two on the CH) |
| USB | 4 x USB-A downstream (one fast-charge port, up to 7.5 W), 1 x USB-C downstream (up to 15 W), USB-B upstream (C model only) |
| USB speed | USB 3.2 Gen1, 5 Gbps (C); USB 3.2 Gen2, 10 Gbps (CH) |
| Stand | Tilt -5° to +15°, swivel ±45°, 150 mm height adjustment |
| Mounting | VESA 100 x 100 mm, M4 screws |
| Weight with stand | 12.81 kg (C), 12.96 kg (CH) |
| Power in normal operation (115 V) | 57.6 W typical (C), 60.7 W typical (CH) |
| Operating range | 0–40°C, 20–80% humidity |
The two USB-C upstream ports on the CH share a combined maximum of 115 W, and power delivery also depends on the connected computer (p. 38).
What’s in the Box
The box holds the monitor, its stand and base, a Quick Start guide, a power cable, and a bag with screws and a screwdriver (M4 x 4). Signal cables vary by region and may include DisplayPort, HDMI, and USB-C or USB-A types (p. 5).
Installation and Setup
Attaching the Base
- Lay the monitor face down on a cushion so the screen isn’t scratched.
- Hold the stand with both hands, tighten the assembly screws to secure the stand to the monitor, and gently attach the base.
- Tighten the screws on the bottom of the base.
- Stand the monitor upright, holding it together with the styrofoam, then pull the styrofoam out without squeezing the panel.
Because the screen is curved, put protective material under it when attaching or detaching the base, and never press down on the monitor (p. 5).
Connecting to a Computer
- Plug the power cord firmly into the back of the monitor.
- Turn off your computer and unplug its power cable.
- Connect the signal cable to the video output on the computer.
- Plug in the power cords for both the computer and the monitor.
- Turn both on. If an image appears, setup is done (p. 7).
Use the monitor’s native 5120 x 1440 resolution; a different resolution triggers an on-screen alert that you can switch off under Setup.
If your PC can’t handle HBR 3, set USB Setting to High Resolution, which limits output to 5120 x 1440 @ 75 Hz (p. 14).
USB Ports and Charging
USB ports can charge a phone or power an external drive, but only while the monitor is on. In standby and off modes the hub is disabled by default. To keep USB power and the hub active in standby, turn on USB Standby Mode in the OSD (default: Off). Switching the monitor off at its power switch cuts power to every USB port (p. 8).
For the Ethernet port, install the LAN driver from the Philips support page and restart. If the connection seems slow, choose High Data Speed in the OSD to support 1G speeds (p. 14).
Controls and On-Screen Display
The front buttons cover power, OSD access, confirmation, navigation, a customizable user key, input switching, going back, and the SmartImage hot key. The last button is the KVM hot key on the C model and the microphone mute key on the CH (p. 10). The OSD main menus include PowerSensor, LightSensor, LowBlue Mode, Input, Picture, PIP/PBP, Audio, Color, OSD Setting, USB Setting, and Setup. The CH adds Webcam and Noise Cancelling.
Assign the user key under OSD Setting > User Key. If you get lost in the menus, choose Setup > Reset to restore factory settings.
Key Features
Integrated KVM
KVM lets two computers share one keyboard and mouse. Connect each computer’s USB upstream cable to the monitor, then open the OSD, go to USB Setting > KVM, and choose between the connected computers. On the C model the options are Auto, USB C, and USB Up; on the CH they are Auto, USB C1, and USB C2. Input selection isn’t automatic, so you must also pick the matching video input in the OSD (pp. 17–20).
MultiView (PIP and PBP)
MultiView shows two sources at once. Go to PIP/PBP > PIP/PBP Mode and choose PIP (a small window over the main picture) or PBP (side by side). You can then set the sub-window input, size (Small, Middle, Large), corner position, and swap sources. Swapping also swaps the audio. In PBP, black bars appear above and below the picture unless you adjust the resolutions of your devices (pp. 22–24).
Windows Hello Webcam and Noise Cancelling (45B1U6900CH)
Press the webcam on top of the monitor to pop it up and turn it to the front. Connect a USB cable from your PC to USB C1 or USB C2, then pick the matching port under KVM in the OSD. Face recognition requires Windows Hello to be set up in Windows 11 (a PIN is required first); the compatibility table also lists Windows 10. Without it, the webcam still works. Noise Cancelling, on by default, filters for human voices during video calls over USB-C (pp. 15–16, 21).
Image Modes and Eye Comfort
Press the SmartImage hot key to cycle through EasyRead, Office, Photo, Movie, Game, Economy, LowBlue Mode, SmartUniformity, and Off. LowBlue Mode reduces shortwave blue light, and LightSensor adjusts brightness to room lighting. With an HDR signal, the same key switches to HDR modes instead. The display is flicker-free with an anti-glare screen.
PowerSensor
PowerSensor uses infrared to detect whether you are at your desk and cuts power use by up to 80% when you leave. By default it detects you 30–100 cm (12–40 inches) away. Raise the setting (up to 4) if you sit farther back. It works only in landscape orientation, and muting the CH’s microphone disables it (pp. 11, 31–32).
Safety Instructions
- Keep the monitor away from direct sunlight and heat sources.
- Never tilt the monitor downward more than -5°. Damage from exceeding this is not covered by warranty (p. 1).
- Lift by the frame, never by pressing on the LCD panel.
- Don’t block the ventilation holes.
- Use only the power cord supplied by Philips, and don’t pull, bend, or place objects on cables.
- The USB-C port should connect only to equipment with a fire enclosure that complies with IEC 62368-1 or IEC 60950-1.
- Use a moving screen saver or periodic screen refresh when leaving static content up. Severe burn-in isn’t covered by warranty.
Cleaning and Maintenance
Unplug the monitor before cleaning. Wipe the screen with a slightly damp or dry soft cloth, and use isopropyl alcohol only for heavy cleaning. Don’t use ammonia, other organic solvents, or oil-based cleaners. If water or a foreign object gets inside, switch off, unplug, and contact a service center. Operate the monitor between 0 and 40°C (pp. 2–3, 47).
Troubleshooting
| Problem | What to try |
|---|---|
| No picture, power LED off | Check the power cord at both ends and make sure the power switch is on |
| No picture, power LED white | Turn on the computer, check the signal cable and pins, and note that energy saving may be active |
| Blurry or fuzzy image | Adjust brightness and contrast, and set the PC to 5120 x 1440 |
| Ghost image after power off | Use a screen saver; most ghost images fade gradually |
| Smoke or sparks | Disconnect mains power immediately and contact Philips customer service |
Frequently Asked Questions
What resolution and refresh rate should I use?
Use 5120 x 1440 at 60 Hz. If the screen shows disturbance, try 75 Hz. Other resolutions can cause fuzzy or jagged text or a “Cannot display this video mode” message (pp. 46, 48).
Can I wall-mount the monitor?
The monitor accepts a 100 x 100 mm VESA interface with M4 screws. Remove the base as described on page 25 and contact the manufacturer for wall-mount installation.
Why are my USB devices not working in standby?
The USB hub is disabled in standby and off modes by default. Turn on USB Standby Mode in the OSD, and remember that the power switch cuts all USB power (p. 8).
Why can’t Windows find the Windows Hello webcam on the 45B1U6900CH?
Open Task Manager (Ctrl + Shift + Esc), go to Services, and find WbioSrvc (Windows Biometric Service). If it’s running, stop it and restart it manually, then set up Windows Hello again in sign-in options (pp. 48–49).
How do I hear audio from the sub-window in MultiView?
Audio follows the main source by default. Choose another under Audio > Audio Source in the OSD. The monitor remembers your last choice at the next startup (p. 49).