
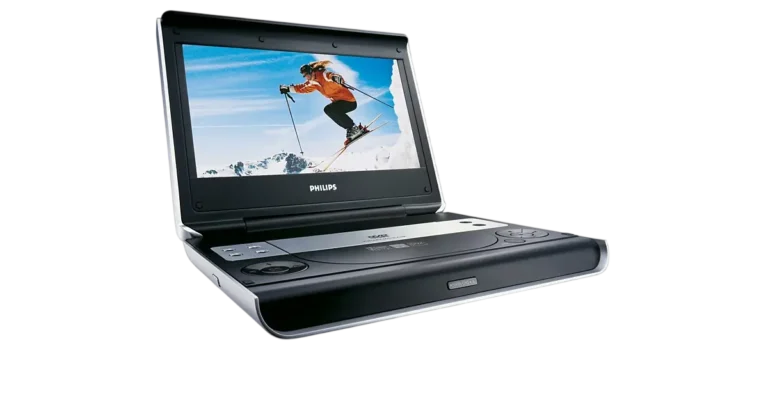
The Philips PET824 and PET724 are portable DVD players that run on a rechargeable battery pack, the supplied AC adapter, or a 12V car adapter. Besides DVD-Video discs, they play Video CDs, audio CDs, MP3/WMA discs, JPEG photo discs, and DivX video discs. Jacks on the right side let you send video and audio to a TV or amplifier, bring in an outside source, or plug in headphones. The remote control copies most of the keys on the player, and an on-screen menu handles language, audio, and parental settings. This page covers the controls, power setup, playback features, menus, specifications, and troubleshooting for both models.
Product Specifications
| Item | Specification |
| Dimensions | 22 x 17.7 x 3.2 cm (8.7 x 6.9 x 1.3 in) |
| Weight | 0.94 kg (2 lb) |
| Power supply | DC 9V, 2.2A |
| Power consumption | 30W |
| Operating temperature | 0–50°C (32–122°F) |
| Laser wavelength | 650 nm (Class 1 laser product) |
| Video system | NTSC / PAL / AUTO |
| Frequency response | 20 Hz–20 kHz ±1 dB |
| Signal-to-noise ratio / channel separation | 85 dB or higher |
| Audio output | 2V ±10%, 10 kΩ load |
| Video output | 1 Vp-p ±20%, 75 Ω load |
What’s in the Box
- Portable DVD player
- Remote control
- Rechargeable battery pack
- AC power adapter
- Car adapter (12V)
- Audio/video cable
- User manual and warranty
Parts and Controls
Jacks and Indicators
The POWER/CHG indicator on the front also serves as the remote sensor. The ON/POWER/OFF switch is on the left side. The right side holds the PHONE 1 and PHONE 2 headphone jacks, AV OUT, AV IN, a COAXIAL digital audio output, and the DC IN 9V socket.
Keys on the Player
The player has OSD, MENU, MONITOR, AV IN/OUT, volume, cursor and OK keys, plus pause, play, stop, previous/next, and OPEN for the disc door. Press stop twice to end playback completely. Press MONITOR repeatedly, then use the left and right keys to adjust brightness, color, and screen shape.
Remote Control
The remote adds search, slow motion, ZOOM, A > B, PLAY-MODE, REPEAT, MUTE, ANGLE, SUBTITLE, LANGUAGE, AUDIO, SETUP, RETURN (the VCD menu page), and a 0–9 keypad. Aim it straight at the front sensor.
Power and Battery Setup
Charging the Battery Pack
- Switch the player off and attach the battery pack.
- Connect the AC adapter to the player and a wall outlet.
- Charge until the red indicator turns off. A charge from a powered-off state takes roughly 4.5–6.5 hours.
The pack may feel warm while charging, which is normal. A low-battery icon appears on screen when power runs low. Rechargeable batteries wear out after a limited number of charge cycles, and battery life varies with use and settings.
Removing the Battery Pack
- Switch the player off and unplug the AC adapter.
- Turn the player upside down.
- Press down the battery pack lock switch.
- Slide the pack off.
AC and Car Adapters
Switch the player off before plugging in or unplugging either adapter. The adapter’s input voltage must match your local or vehicle voltage. Hold the plug, not the cord, when disconnecting.
Remote Control Battery
Open the battery compartment and pull out the protective plastic tab (first use only). Insert one CR2025 3V lithium battery and close the compartment.
Playing Discs
Loading and Starting a Disc
- Press OPEN to open the disc door.
- Place the disc label side up, even for double-sided DVDs, and make sure it sits in the recess.
- Push the door closed gently.
- Slide the POWER switch to ON.
Playback starts automatically. If the disc offers a menu, use the cursor keys to highlight an item and press OK. A normal mechanical noise during playback is not a fault. A disc from a different region will not play; a region code notice appears and the disc should be removed.
Supported Disc Types
The player handles DVD-Video, Video CD, audio CD (including CD-R, CD-RW, DVD±R, and DVD±RW), MP3/WMA CD, JPEG discs, and DivX video (DivX 5, 4, 3, and DivX VOD). Copy-protected WMA files cannot be played.
DivX VOD
To rent or buy videos, open SETUP, go to Preferences, and select DivX VOD to display your registration code. Enter that code at www.divx.com/vod, download the video to a CD-R, and play it in this player. Videos from DivX VOD play only on this player.
Photo Discs
Select a folder and press OK to start a slide show. Left and right rotate the picture, up and down flip it, and MENU returns to the folder screen.
Playback Features
| Feature | How it works |
| Search | Press the search keys repeatedly for 2X, 4X, 8X, 16X, or 32X, forward or backward |
| Slow motion | Press repeatedly for 1/2, 1/4, 1/8, or 1/16 speed; backward slow motion is for DVDs only |
| Still / frame step | Press pause once for a still image, again for frame-by-frame |
| Zoom | Cycles through 2X, 3X, 4X, 1/2, 1/3, 1/4, then normal |
| Audio | Mono left, mono right, mixed mono, or stereo |
| Repeat | DVD: chapter, title, all. VCD: track, all |
| Play modes | Shuffle, random, or program |
Press OK or play to return to normal speed. To loop a section, press A > B at the start, again at the end, and a third time to exit. MENU opens the disc menu, and ANGLE, LANGUAGE, and SUBTITLE cycle through whatever the disc offers. If a crossed-circle symbol appears, the player or disc does not allow that action.
Connecting Headphones and Other Equipment
Plug headphones into PHONE 1 or PHONE 2. To use a TV or amplifier, turn the player off first, then connect the cable: yellow for video, white for left audio, red for right audio. Press AV IN/OUT on the player to choose A/V OUT (send out) or A/V IN (AUX) (bring in an outside source). The COAXIAL jack carries digital audio.
Settings and Menus
Changing the Menu Language
English is the default. Depending on region, other choices include French, Spanish, German, Simplified Chinese, and Traditional Chinese.
- Slide POWER to ON and press SETUP.
- Select GENERAL SETUP and press OK.
- Select OSD LANG and press the right key.
- Choose a language and press OK.
Setup Menu Overview
| Menu | Options |
| General Setup | TV Display, TV Type, OSD Lang, SPDIF, Captions, Screen Saver |
| Audio Setup | Speaker Setup, Dolby Digital Setup, Channel Equalizer, 3D Processing |
| Preferences | Audio, Subtitle, Disc Menu, Parental, DivX VOD, Power Saving, Default |
| Password Setup | PW Mode, Password |
Power Saving applies to battery playback, and Default restores factory settings. Parental options can only be changed while password mode is off. The default password is 99999. Pressing OSD during playback opens a list for jumping to a title, chapter, or time.
Safety Instructions
- Do not take the player apart. The laser can harm eyes, and service belongs to qualified personnel.
- The player is not waterproof. Keep it away from water, dripping, and liquid-filled objects, and unplug the AC adapter if liquid or objects get inside.
- Keep it away from heaters and direct sunlight, and do not block ventilation openings.
- Do not use it while driving or cycling, and do not touch the lens.
- Protect the power cord from being walked on or pinched.
- Listen at a moderate volume: start low, raise it slowly until the sound is clear and comfortable, and take breaks (page 3).
- Install batteries with + and − as marked and never mix old and new. Incorrect replacement risks explosion, so use the same or an equivalent type.
Cleaning and Maintenance
Clean the player with a dry cloth. Avoid cleaners containing alcohol, ammonia, benzene, or abrasives. Wipe discs from the center outward with a soft, lint-free cloth, and store them in cases. Do not stick paper or tape on a disc.
Keep the disc door closed to protect the lens from dust. If discs read poorly, try a commercial cleaning CD/DVD before seeking repair; other lens-cleaning methods may destroy the lens. Moving the player from cold to warm surroundings can fog the lens, so let the moisture evaporate before playing.
Troubleshooting
Do not try to repair the player yourself, as that invalidates the guarantee.
| Problem | What to try |
| No power | Check both ends of the power cord, test the outlet with another appliance, and confirm the battery pack and car adapter are seated correctly |
| Disc won’t play | Make sure the label faces up, clean the disc, and try a different disc |
| Remote doesn’t respond | Aim it at the front sensor, clear obstacles, and check or replace the battery |
| Distorted or black-and-white picture on a TV | Match the NTSC/PAL setting to your TV and use discs formatted for that standard |
| No sound | Check audio connections; with a hi-fi amplifier, try another source |
| No digital audio | Check the digital connections and confirm digital output is on in SETUP |
| Some commands ignored | The disc may not permit them; see the disc’s inlay |
Frequently Asked Questions
Which models does this manual cover?
It covers the Philips PET824 and PET724 portable DVD players. The manual does not describe any difference between them, such as screen size.
How long does the battery take to charge?
Roughly 4.5–6.5 hours when charging from a powered-off state. Charging is finished when the red indicator goes out.
Why won’t my disc play?
Check that the label faces up and the disc is clean. A disc from a different region won’t play, and a region code notice appears.
What is the default password, and how do I change parental settings?
The default is 99999. Parental options can be changed only while password mode is off, and the Password option changes the code.
Why is the picture distorted or missing color on my TV?
The NTSC/PAL setting probably doesn’t match the TV. Match the two settings.
Is it normal for the player to get warm or show tiny dots on the screen?
Yes to both. The surface warms during long use, and tiny black or bright colored dots are a normal result of LCD manufacturing.
What does the warranty cover, and who do I contact?
Philips gives a one-year limited warranty against defects in materials and workmanship, with the sales receipt as proof of purchase. Commercial or rental use is excluded. In the U.S., call 1-888-PHILIPS (744-5477).